Crud (CREATE, READ, UPDATE AND DELETE) Api With GraphQL, Node.js And Mongo Database

What is GraphQL ?
GraphQL is a query language for APIs and a runtime for fulfilling those queries with your existing data - (GraphQL official website).
GraphQL provides a complete and understandable description of the data in your API.
Ask for what you need, get exactly that
Queries always return predictable results.
Basic GraphQL Schemas And Types
const schema = buildSchema(`
    type Phone {
        id: ID
        name:String
        isQuality:Boolean
    }
`)

export default schema;
Object Types And Fields
Object Type basically represent a kind of object you can fetch from your service, and what fields it has. We have to define the object type and a field on every schema, consider the example below.
  type Phone {
        id: ID
        Name:String
        isQuality:Boolean
    }
Phone is a GraphQL Object Type, meaning it's a type with some fields. id, Name are fields on the** Phone** type. This means that Name and id are the fields that can appear in any part of a **GraphQL **query that operates on the Phone type. String and Boolean are some of the built-in scalar types which resolve to a single scalar object.
Query And Mutation Types
The query type is responsible for defining what type of data should be returned when we make the request, and then we have mutation to mutate Phone type.
    input PhoneInput{
       id: ID
       name:String
       isQuality:Boolean
    }
This input type basically defines what the input takes, you need to create the mutation type so you can use the input to create new Phones in graphQL or whatever database is connected to.
     type Mutation {
     createPhone(input:PhoneInput):Phone //after creating we return the phone
    }
Resolvers And It's Role
Resolvers are functions that respond to queries and mutations, it gives us the result of the query. Check the example below.
const resolvers = {
    phone: () => {
        return {
            "id": 5658489489,
            "Name": "Galaxy s21 ultra",
       ].  "isQuality":"True"
        }
    },
};
The above is a hard coded example of a resolver returning data . It can return data from another REST API, database, cache, constant et cetera. Similarly we can have a resolver to mutate phone type so we can create new phone.
Scalar Types
When we define a data type, we need to define what type of input field it's going to take , whether a string ,int or boolean. For example if we decide to add **year **and color to the schema, year will be an integer and color will be a string type since year is a number and color will be the name of it which is basically a string.
year:Int
color:String
These are some of the main types, we can also create a custom type.
For example If we want multiple Brands a schema field, we can create the type and insert it, check the example below.
  enum Brands {
        Samsung
        Nokia
        Apple
        OTHER
    }
We can also have reviews which takes multiple data fields.
       type Reviews {
        name: String
        text: String
    }
And check below to see how we use it.
    input PhoneInput{
      id: ID
      name:String
      brand: Brands //represents types
      reviews: [Reviews] //takes inputs thats why it's an array
    }
Now that you know what a GraphQL object type looks like and how to read the basics of the GraphQL language. Let's combine all of this to implement the CRUD API with Express, Node.js, And MongoDB. At the end of this article, you will build an API endpoints to utilize the CREATE, READ, UPDATE And ** DELETE** operations.
Prerequisites
To carry on with this tutorial, you must be familiar with basic **JavaScript ES6 syntax **. You must also have Node.js installed and be able to use npm to install packages. Familiarity with the terminal is a big plus. Mongo Atlas account or create one here.
We will begin by initializing a new project with npm, open your favorite text editor and locate to where you want to save the tutorial and then run the following command:
npm init
This will give us a package.json file so we can begin to install the necessary ** dev** dependencies and the **main packages for the tutorial. Run the following command to install the dev **dependencies:
npm i --s-dev babel-cli babel-preset-env babel-preset-stage-0
After installation is done, we can now install the main packages, run:
npm i express mongoose express-graphql graphql graphql-tools
We need to set up babel so we can write** ES6 syntax**, create .babelrc file and add the following code:
{
    "presets":[
        "env",
        "stage-0"
    ]
}
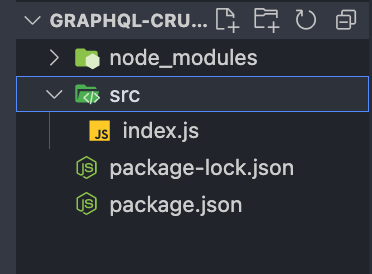
Good now let's create an entry file index.js, i like to separate my files so we can create ** src** directory and add the entry file index.js and the necessary data in it. Run the following code to create the **src ** directory together with the entry file in it:
mkdir src && cd src && touch index.js
This gives us
Now open index.js file and paste the following code to configure express to start the server:
import express from 'express';
const app = express();
const port = 5050;


app
 .listen(port,
() => console.log(`Running on server port localhost: ${port}`));
Great!! let's make a few changes to ** package.json** file so we can start the server with npm. Open package.json file and at the scripts section.
  "scripts": {
    "test": "echo \"Error: no test specified\" && exit 1"
  },
Add this one line below the **test ** script:
"start": "nodemon src/index.js --exec babel-node -e js"
In the end your ** package.json** file's scripts section must copy this
  "scripts": {
    "test": "echo \"Error: no test specified\" && exit 1",
     "start": "nodemon src/index.js --exec babel-node -e js"
  },
We are using nodemon - a package that listens to changes in our app and restart the server Automatically for us. Install it via npm:
npm install nodemon
And If you followed through accordingly, you should be able to start the server with:
npm start
And you will see
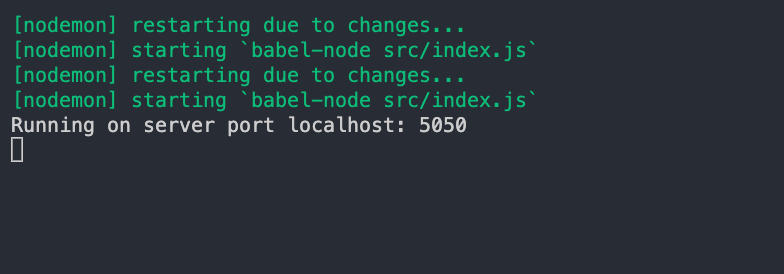
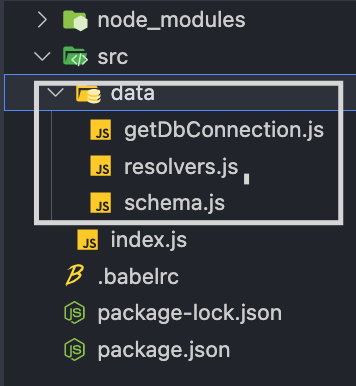
In your terminal, meaning we are ready to move on to the rest of the tutorial. Firstly you need to make a data directory in the src dir and create three files in it - getDbConnection.js - to help us connect to the database , resolvers.js - to hold the functions that will communicate with the database and schema.js - to hold the GraphQL schema types. If you are in the top level directory (outside the src dir), run the following command to create them once, conversely, you can create them manually:
cd src && mkdir data && cd data && touch getDbConnection.js resolvers.js schema.js
Should give you this
Great!!! now we have all the files we will need to handle data and the database, let's begin by defining the schema so open** schema.js** file and add the following code:
import { makeExecutableSchema } from 'graphql-tools';

 const typeDefs = `
    type Phone {
        id: ID
        name:String
        brand: Brands
        hardware:String
        isQuality:Boolean
        reviews: [Review]
    }
       type Review {
        username: String
        text: String
    }
    enum Brands {
        Samsung
        Nokia
        Apple
        OTHER
    }

    input PhoneInput {
        id: ID
        name:String
        brand: Brands
        hardware:String
        isQuality:Boolean
        reviews: [ReviewInput]
    }

    input ReviewInput {
        username: String
        text: String
    }
`
const schema = makeExecutableSchema({ typeDefs });

export { schema };
In the above code , we have a** Phone** type with fields, type Review ,** enum** type Brand , PhoneInput - To help you create new phones, ReviewInput - To create new reviews. And we have passed typeDefs to makeExecutableSchema() to help us combine the schema and resolvers to make executable schema. You will see how it works shortly.
Connecting a Database
With the above in place we can now go ahead and connect to the database (MongoDB) so we can use resolvers to communicate with it. Firstly you must set up your ** Mongo Atlas account ** to obtain your connection string to connect to the application. [See below on how to set up your Mongo Atlas account].
Sign up for the first time here. It's free of charge
After signing up it should take you to the following page.
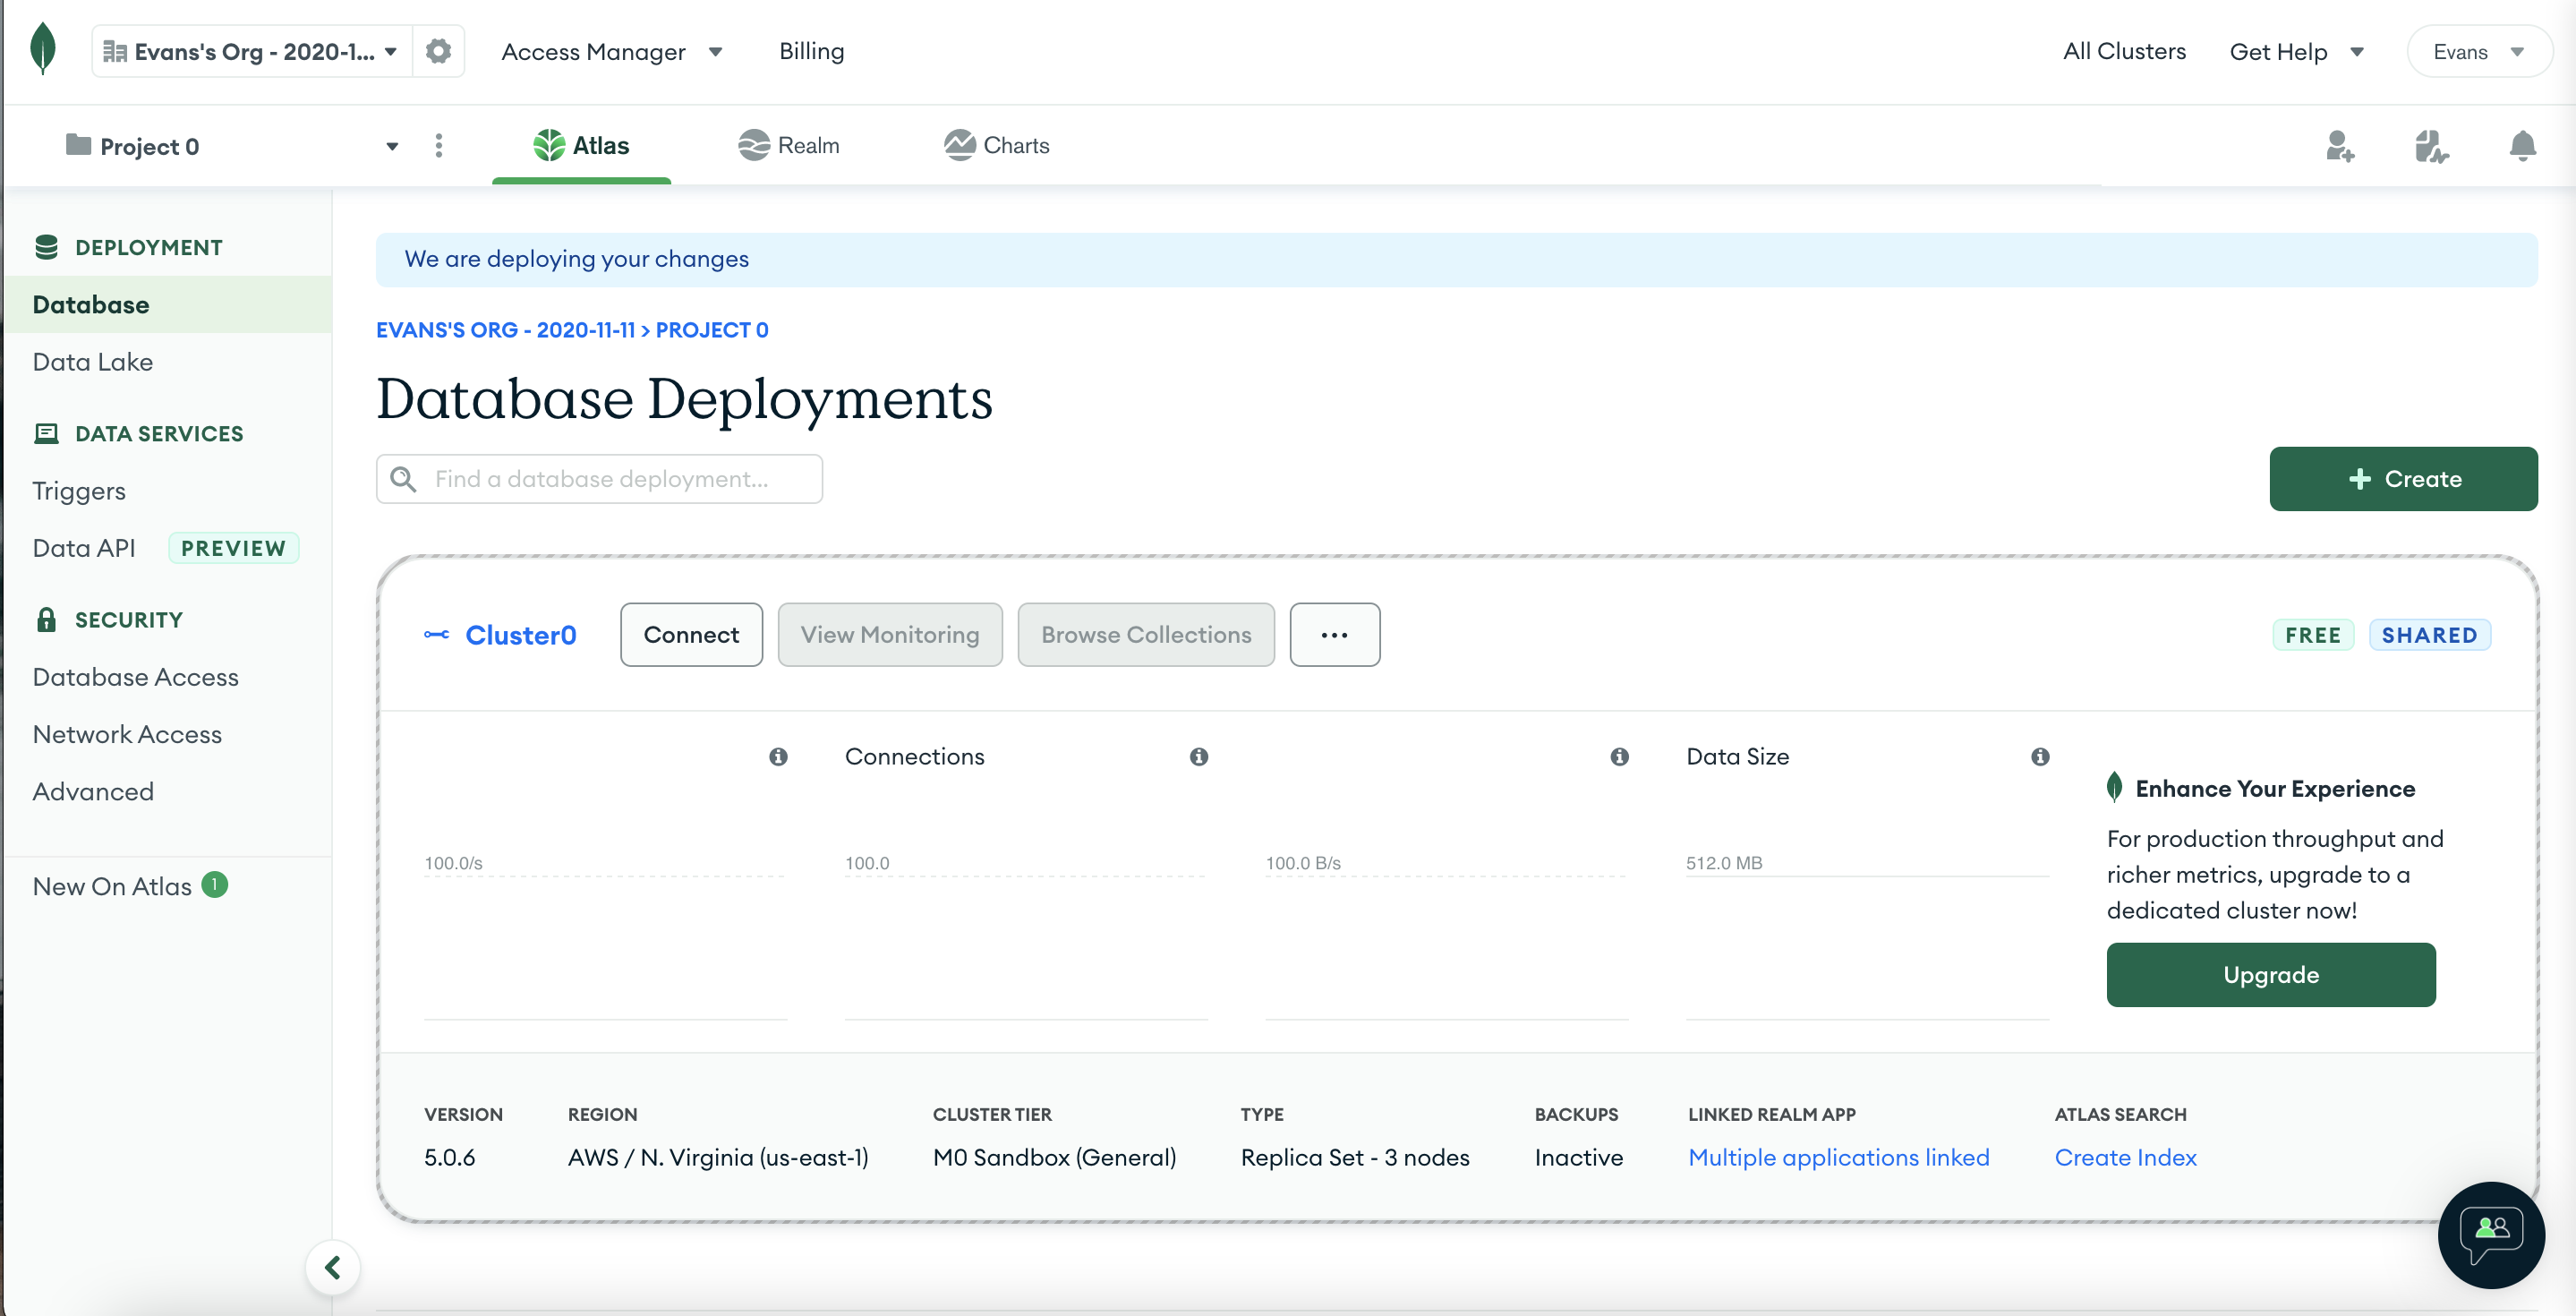
We need to create a new **user ** so click on Database Access and add a new **user **.
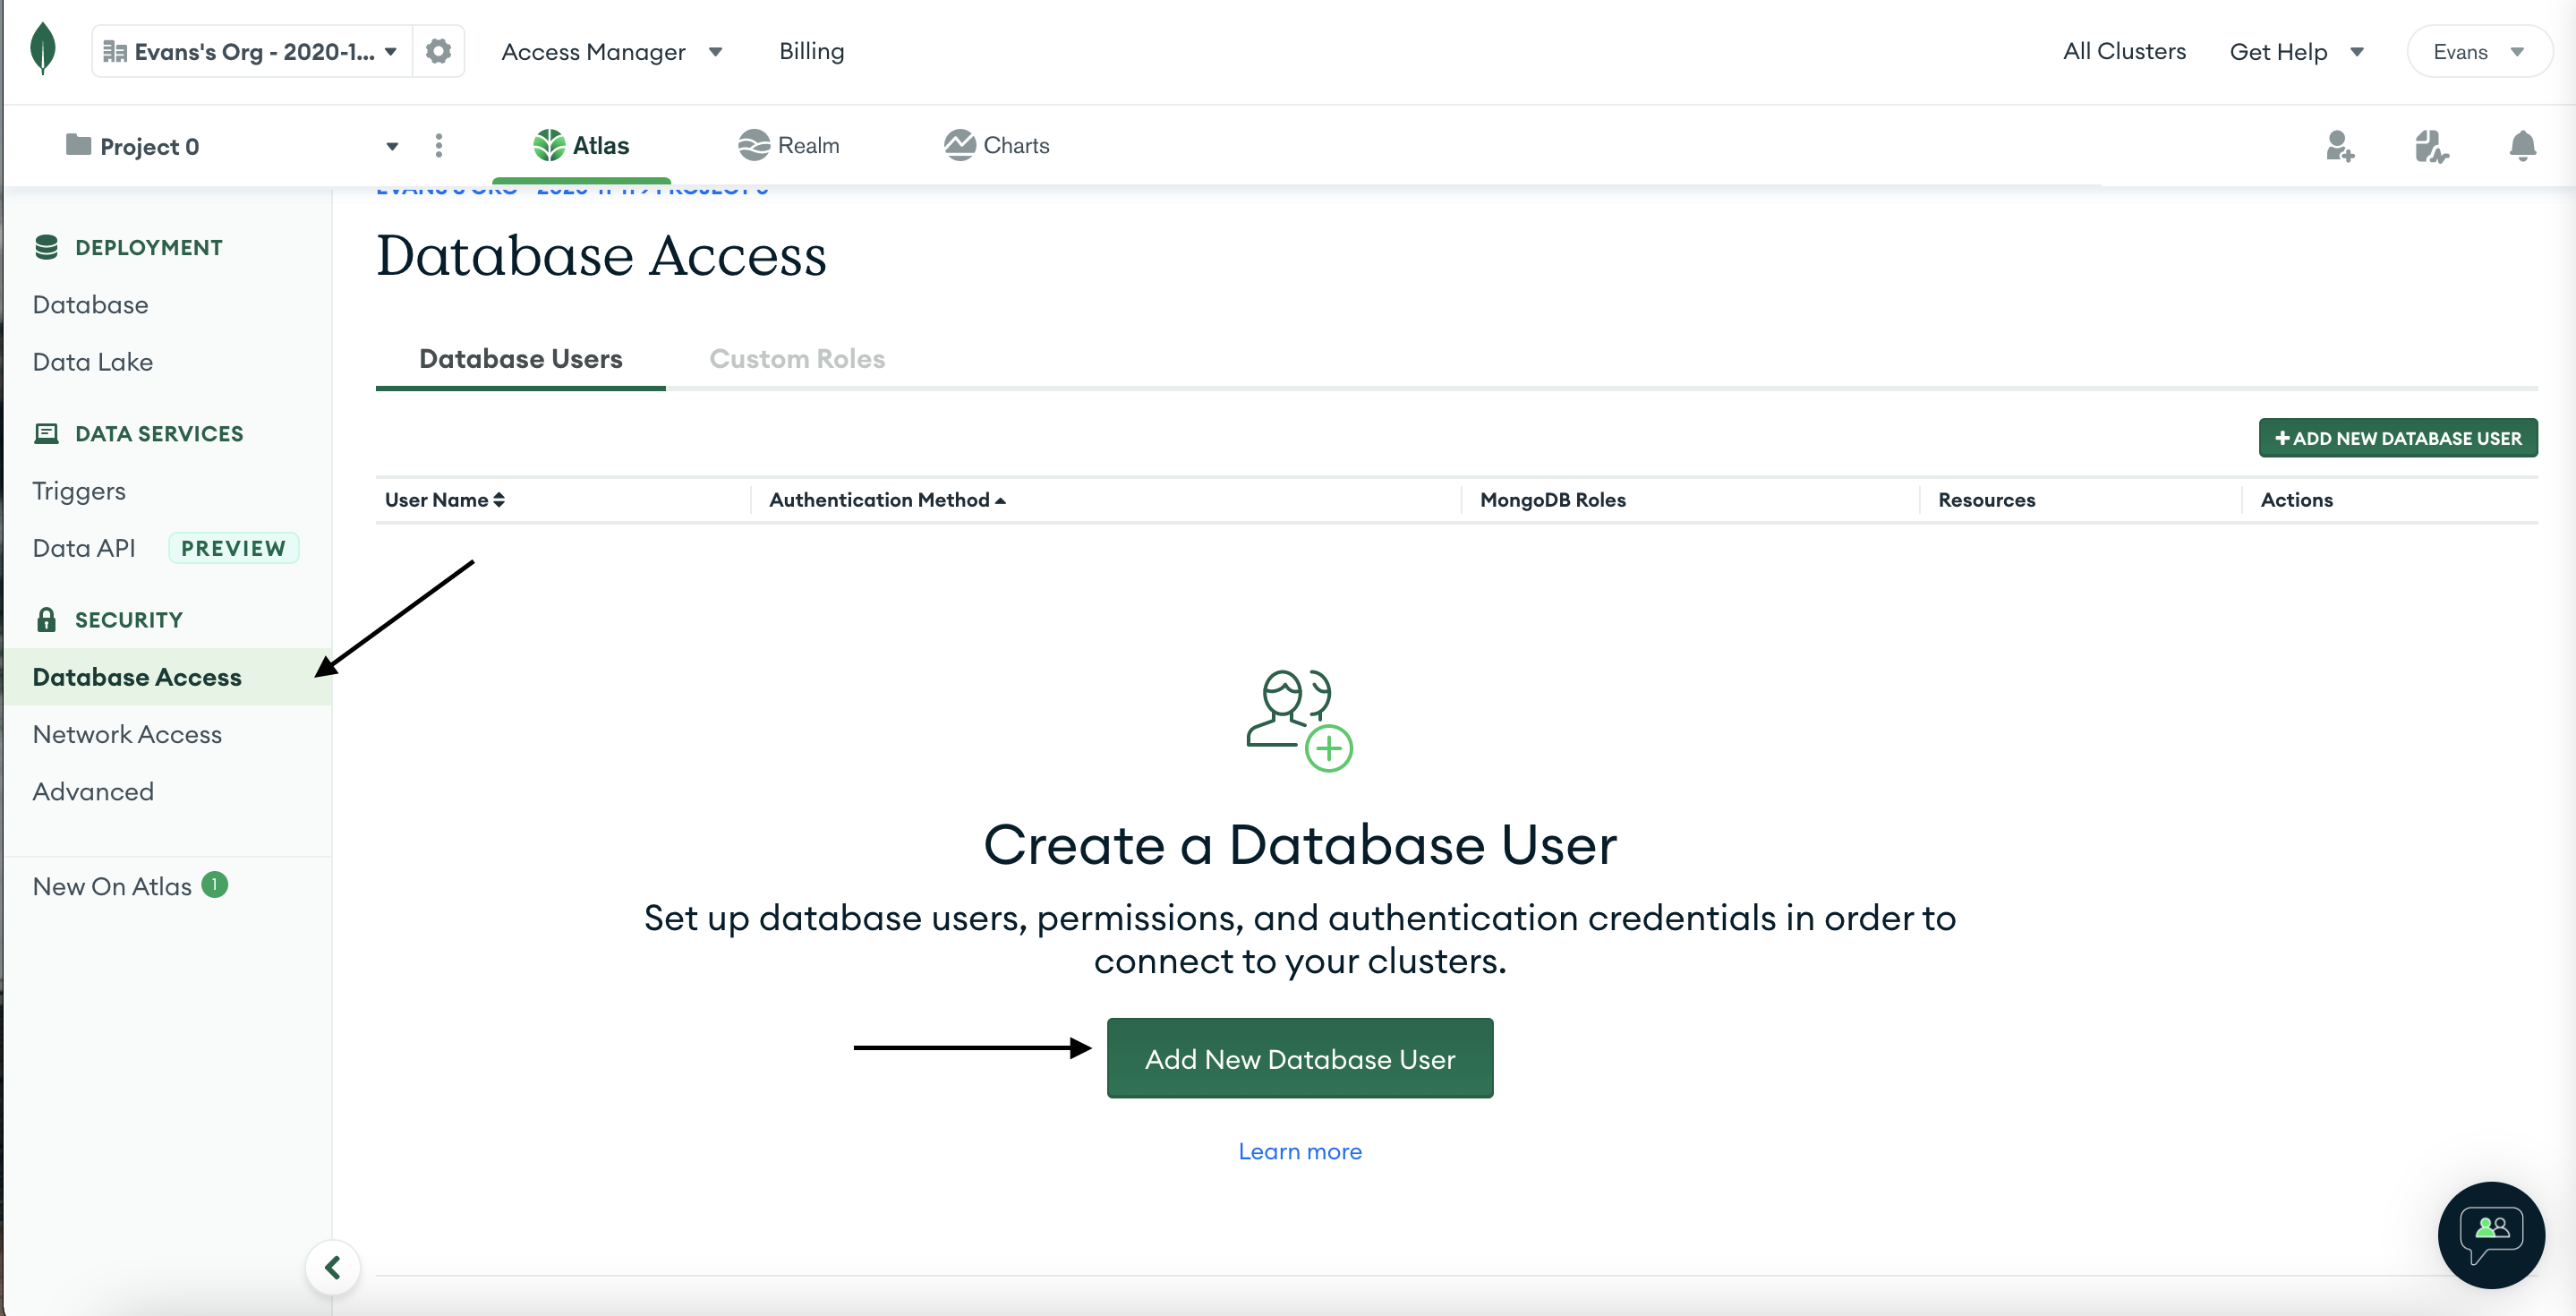
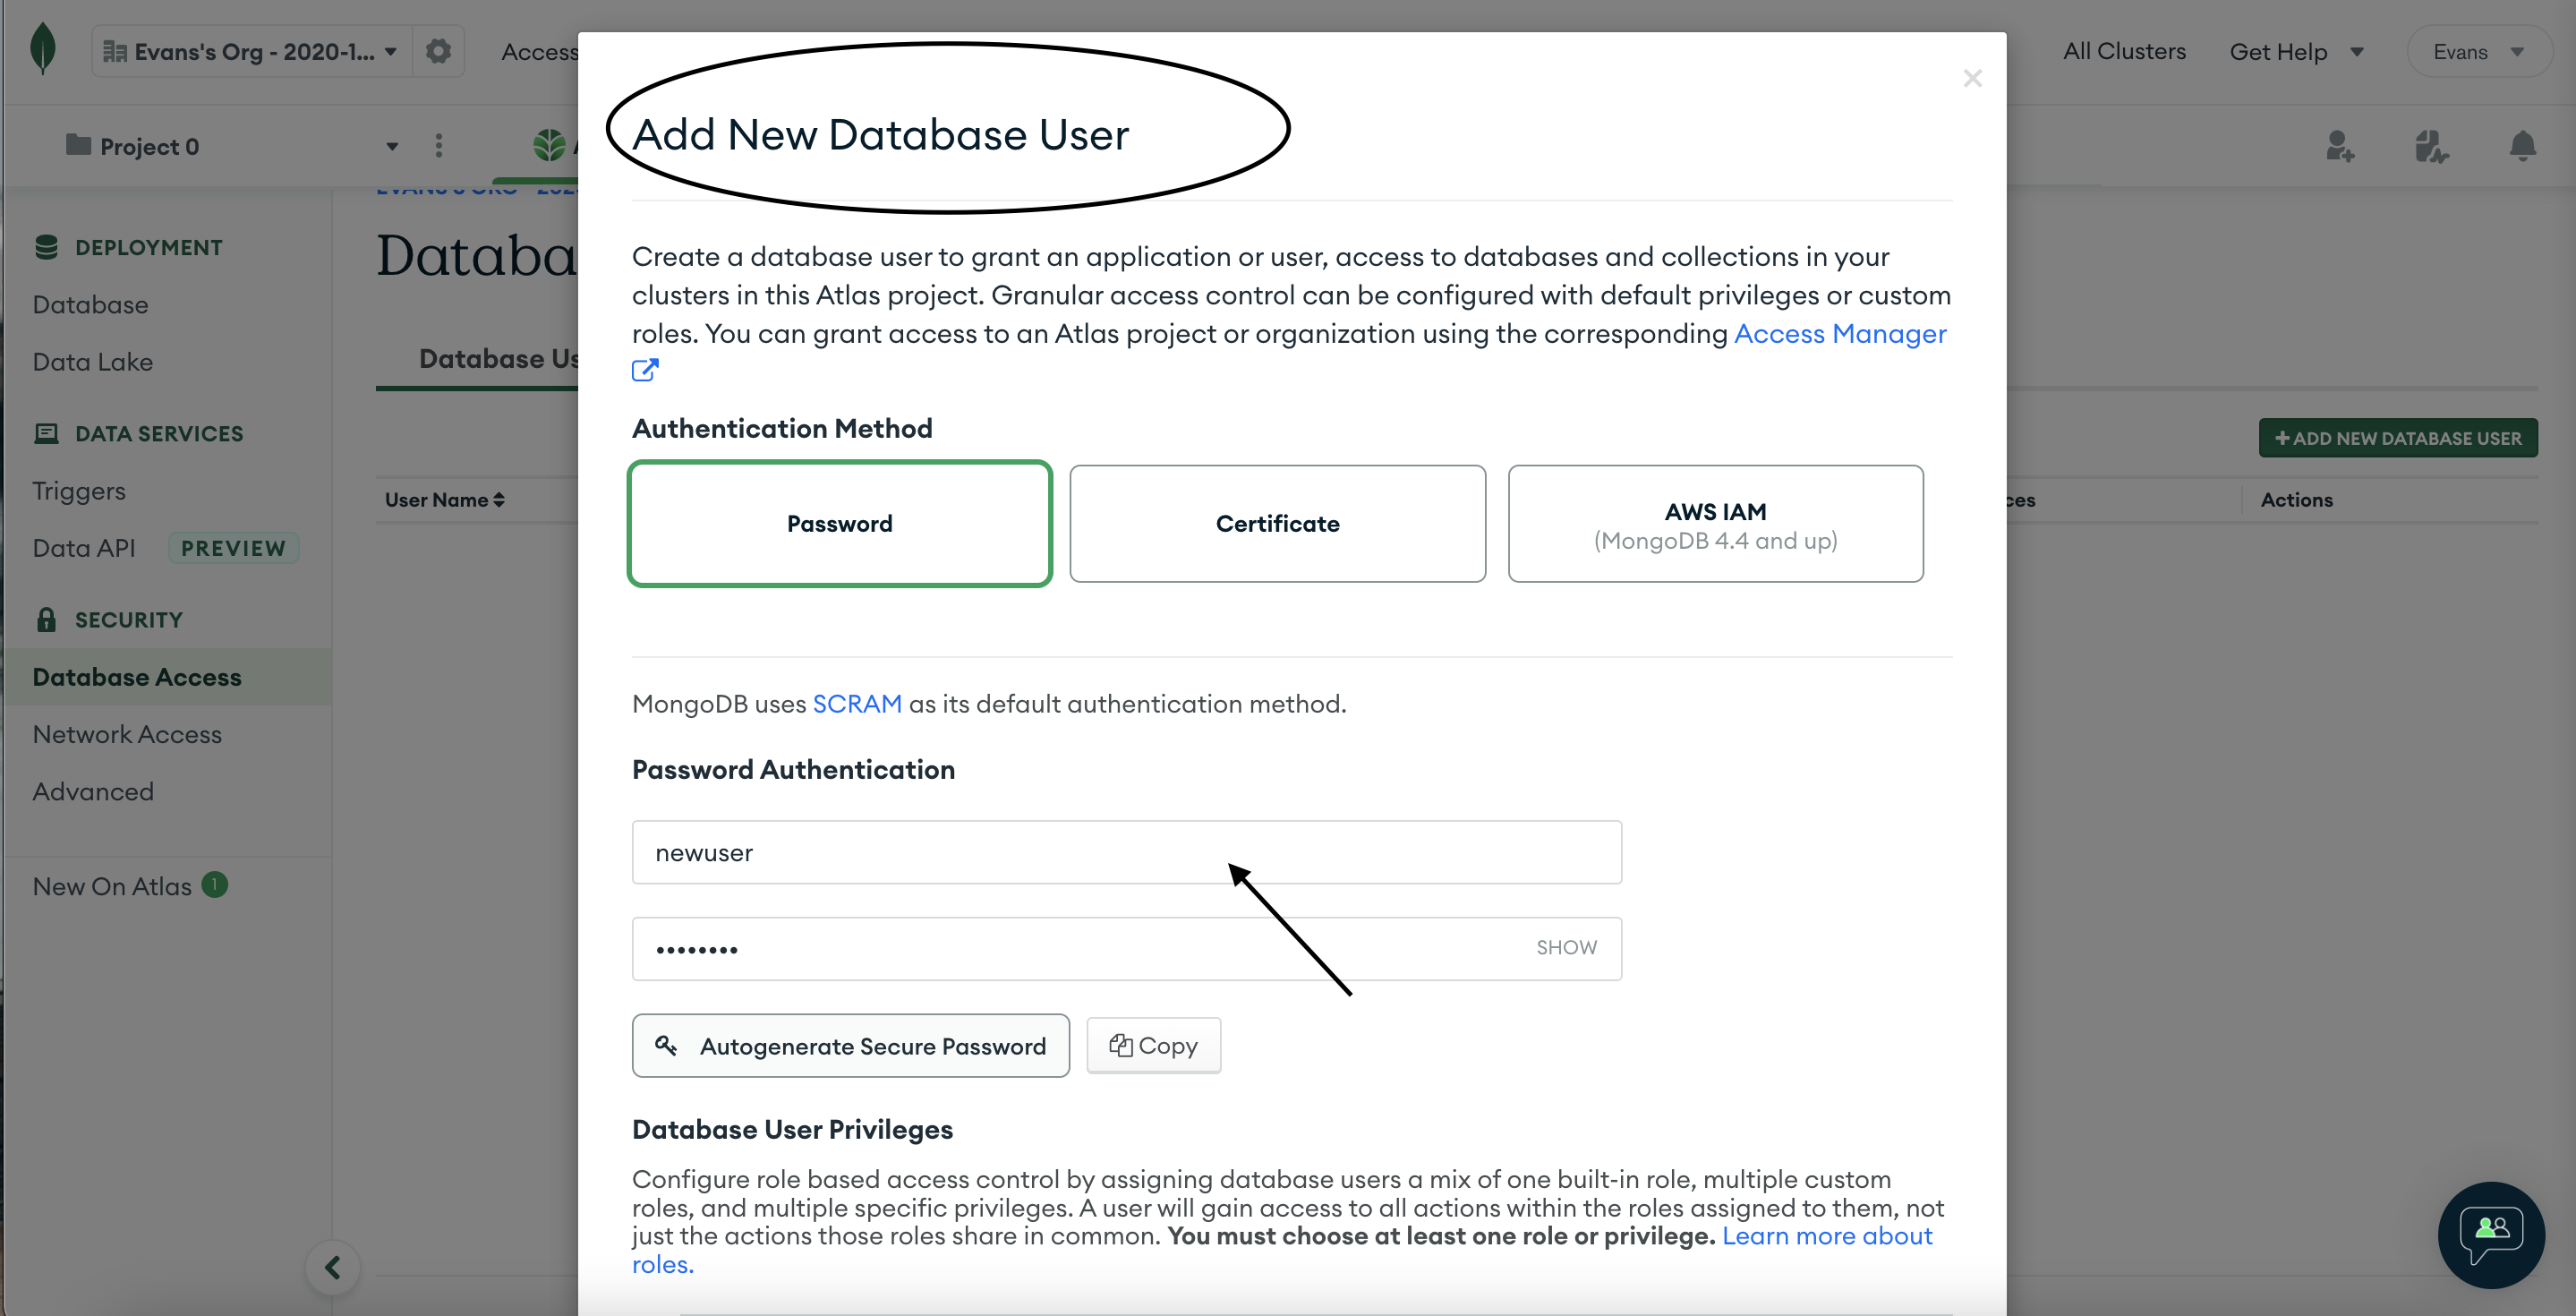
You need to enter a few details. Username and the password, you will need these information so make sure to use something you can recall.
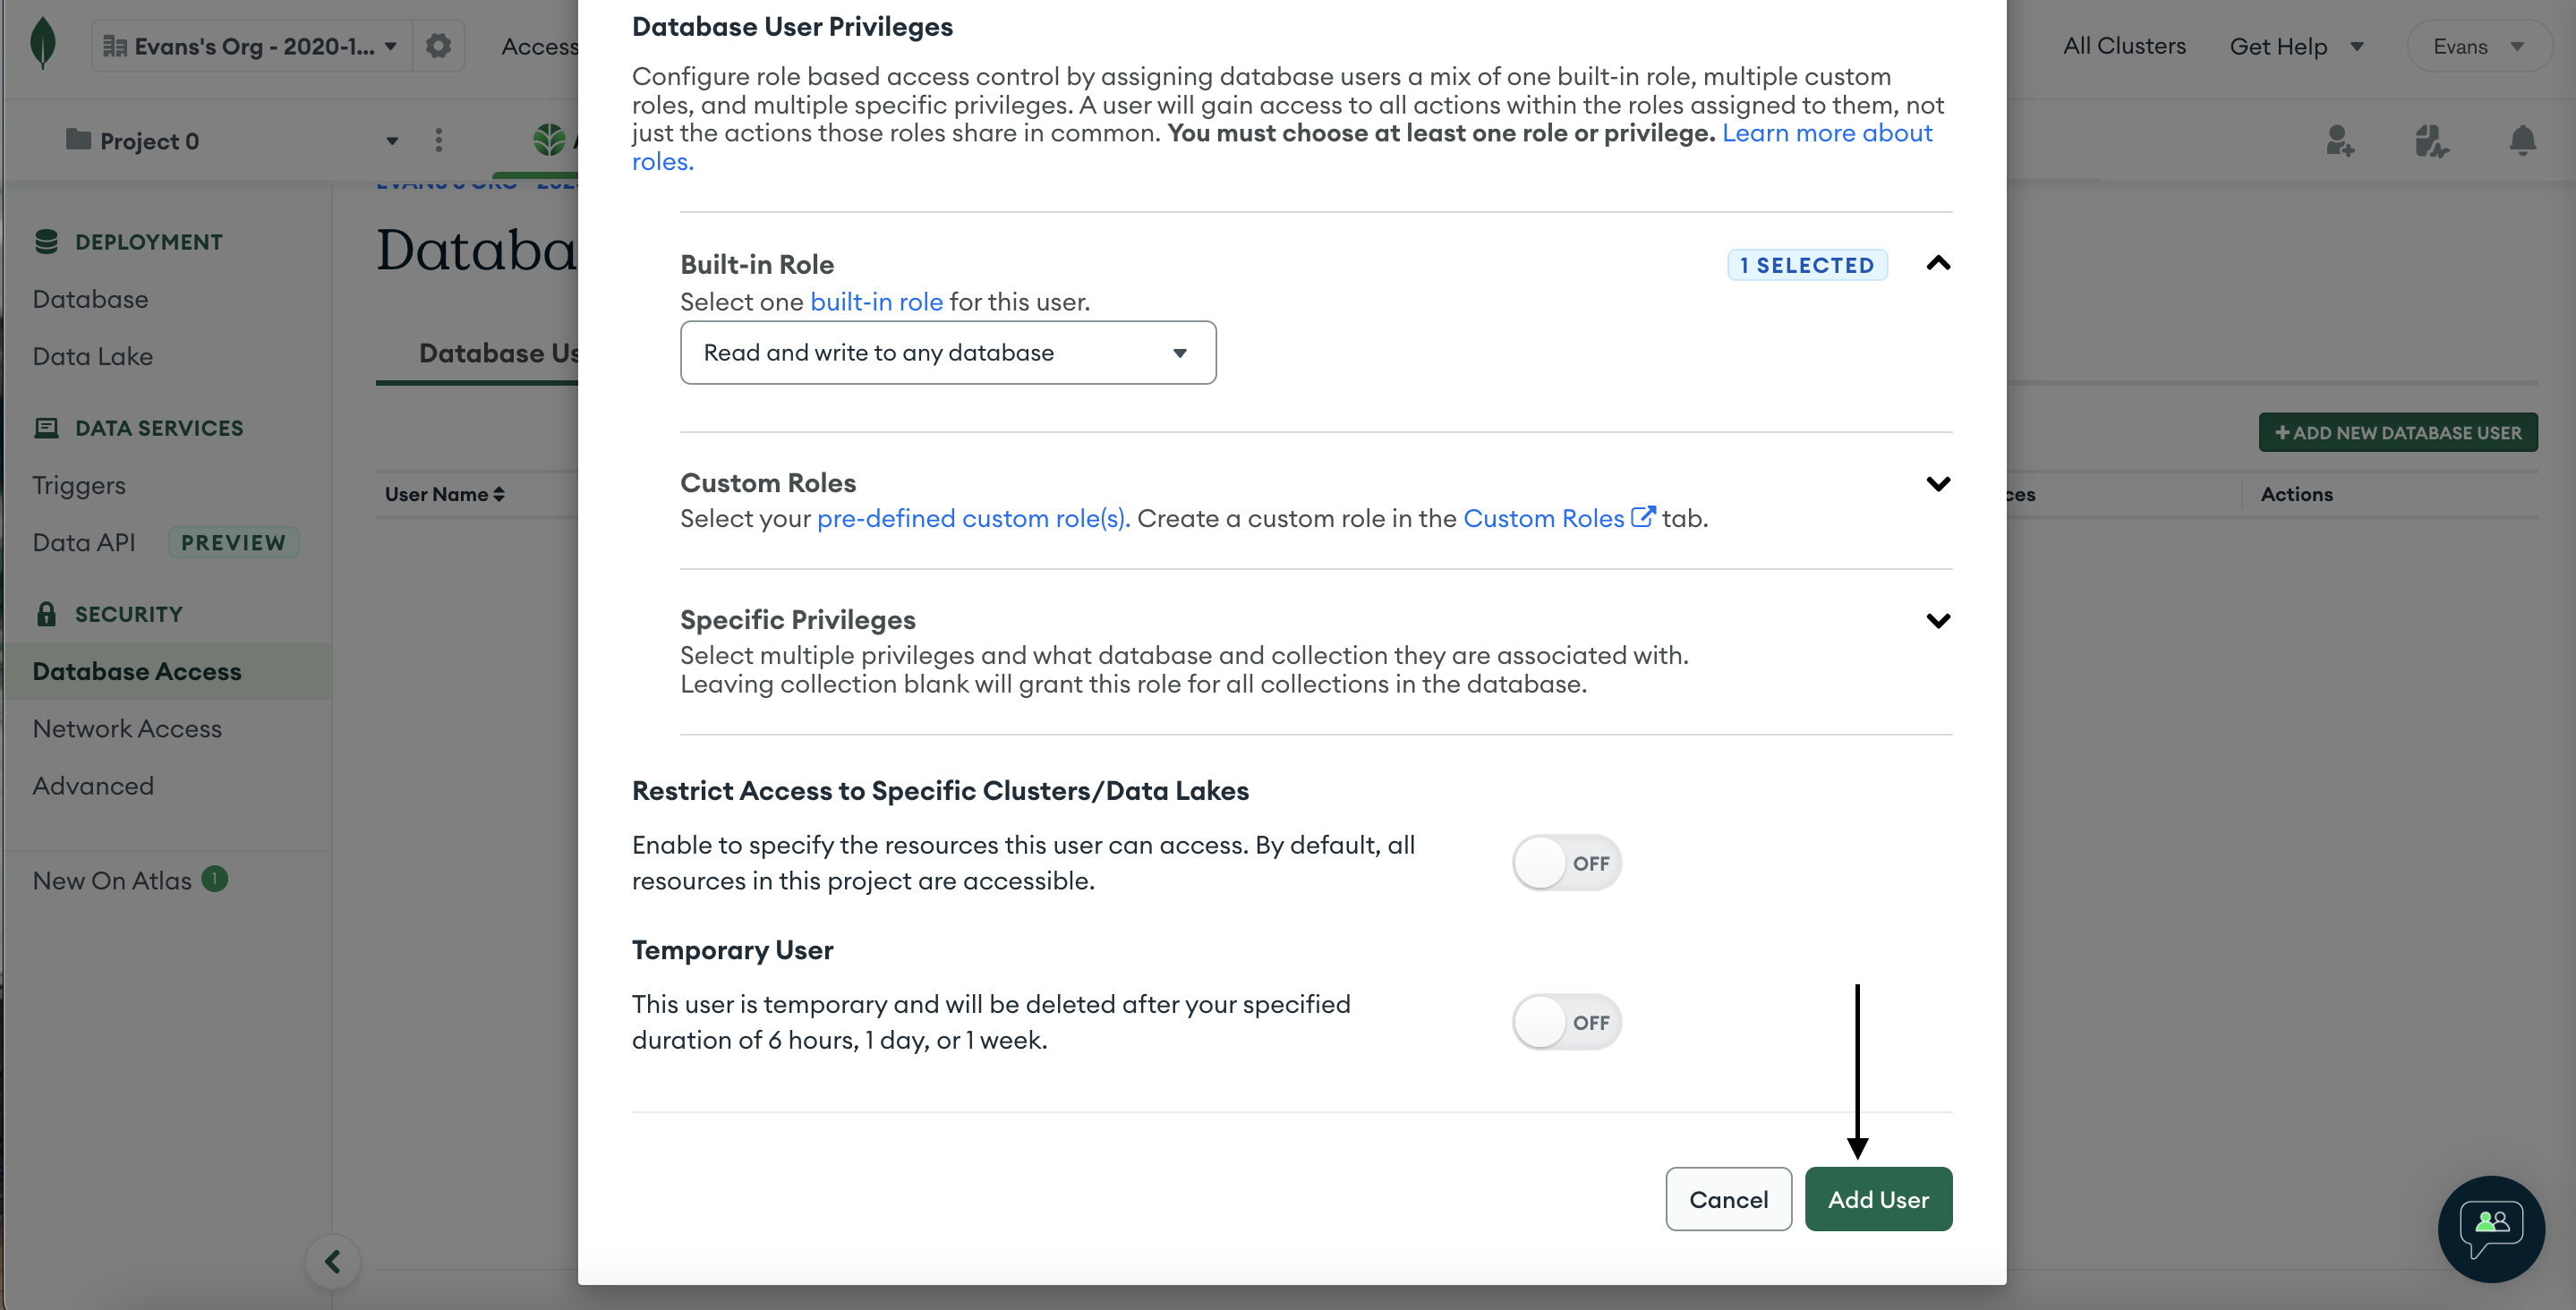
Now scroll down and click Add User
After a new user is added successfully, let's go back to the application to make some changes, open getDbConnection.js file and add the following code:
import mongoose from 'mongoose';

const dbUrl = 'place your mongo atlas connection string here'

mongoose.connect(dbUrl, {
    useNewUrlParser: true,
    useUnifiedTopology: true,
});

const db = mongoose.connection;
db.on("error", console.error.bind(console, "CONNECTION ERROR:"));
db.once("open", () => {console.log("CONNECTED TO DATABASE")});

const phoneSchema = new mongoose.Schema({
    name: {
        type: String
    },
    brand: {
        type: String,
        enum : [ "Samsung",
        "Nokia",
        "Apple",
        "OTHER"],
        default: ''
    },
    hardware: {
        type: String
    },
    isQuality: {
        type: Boolean
    },
    reviews: {
        type: Array
    }
});

const Phones = mongoose.model('phones', phoneSchema);
export { Phones };
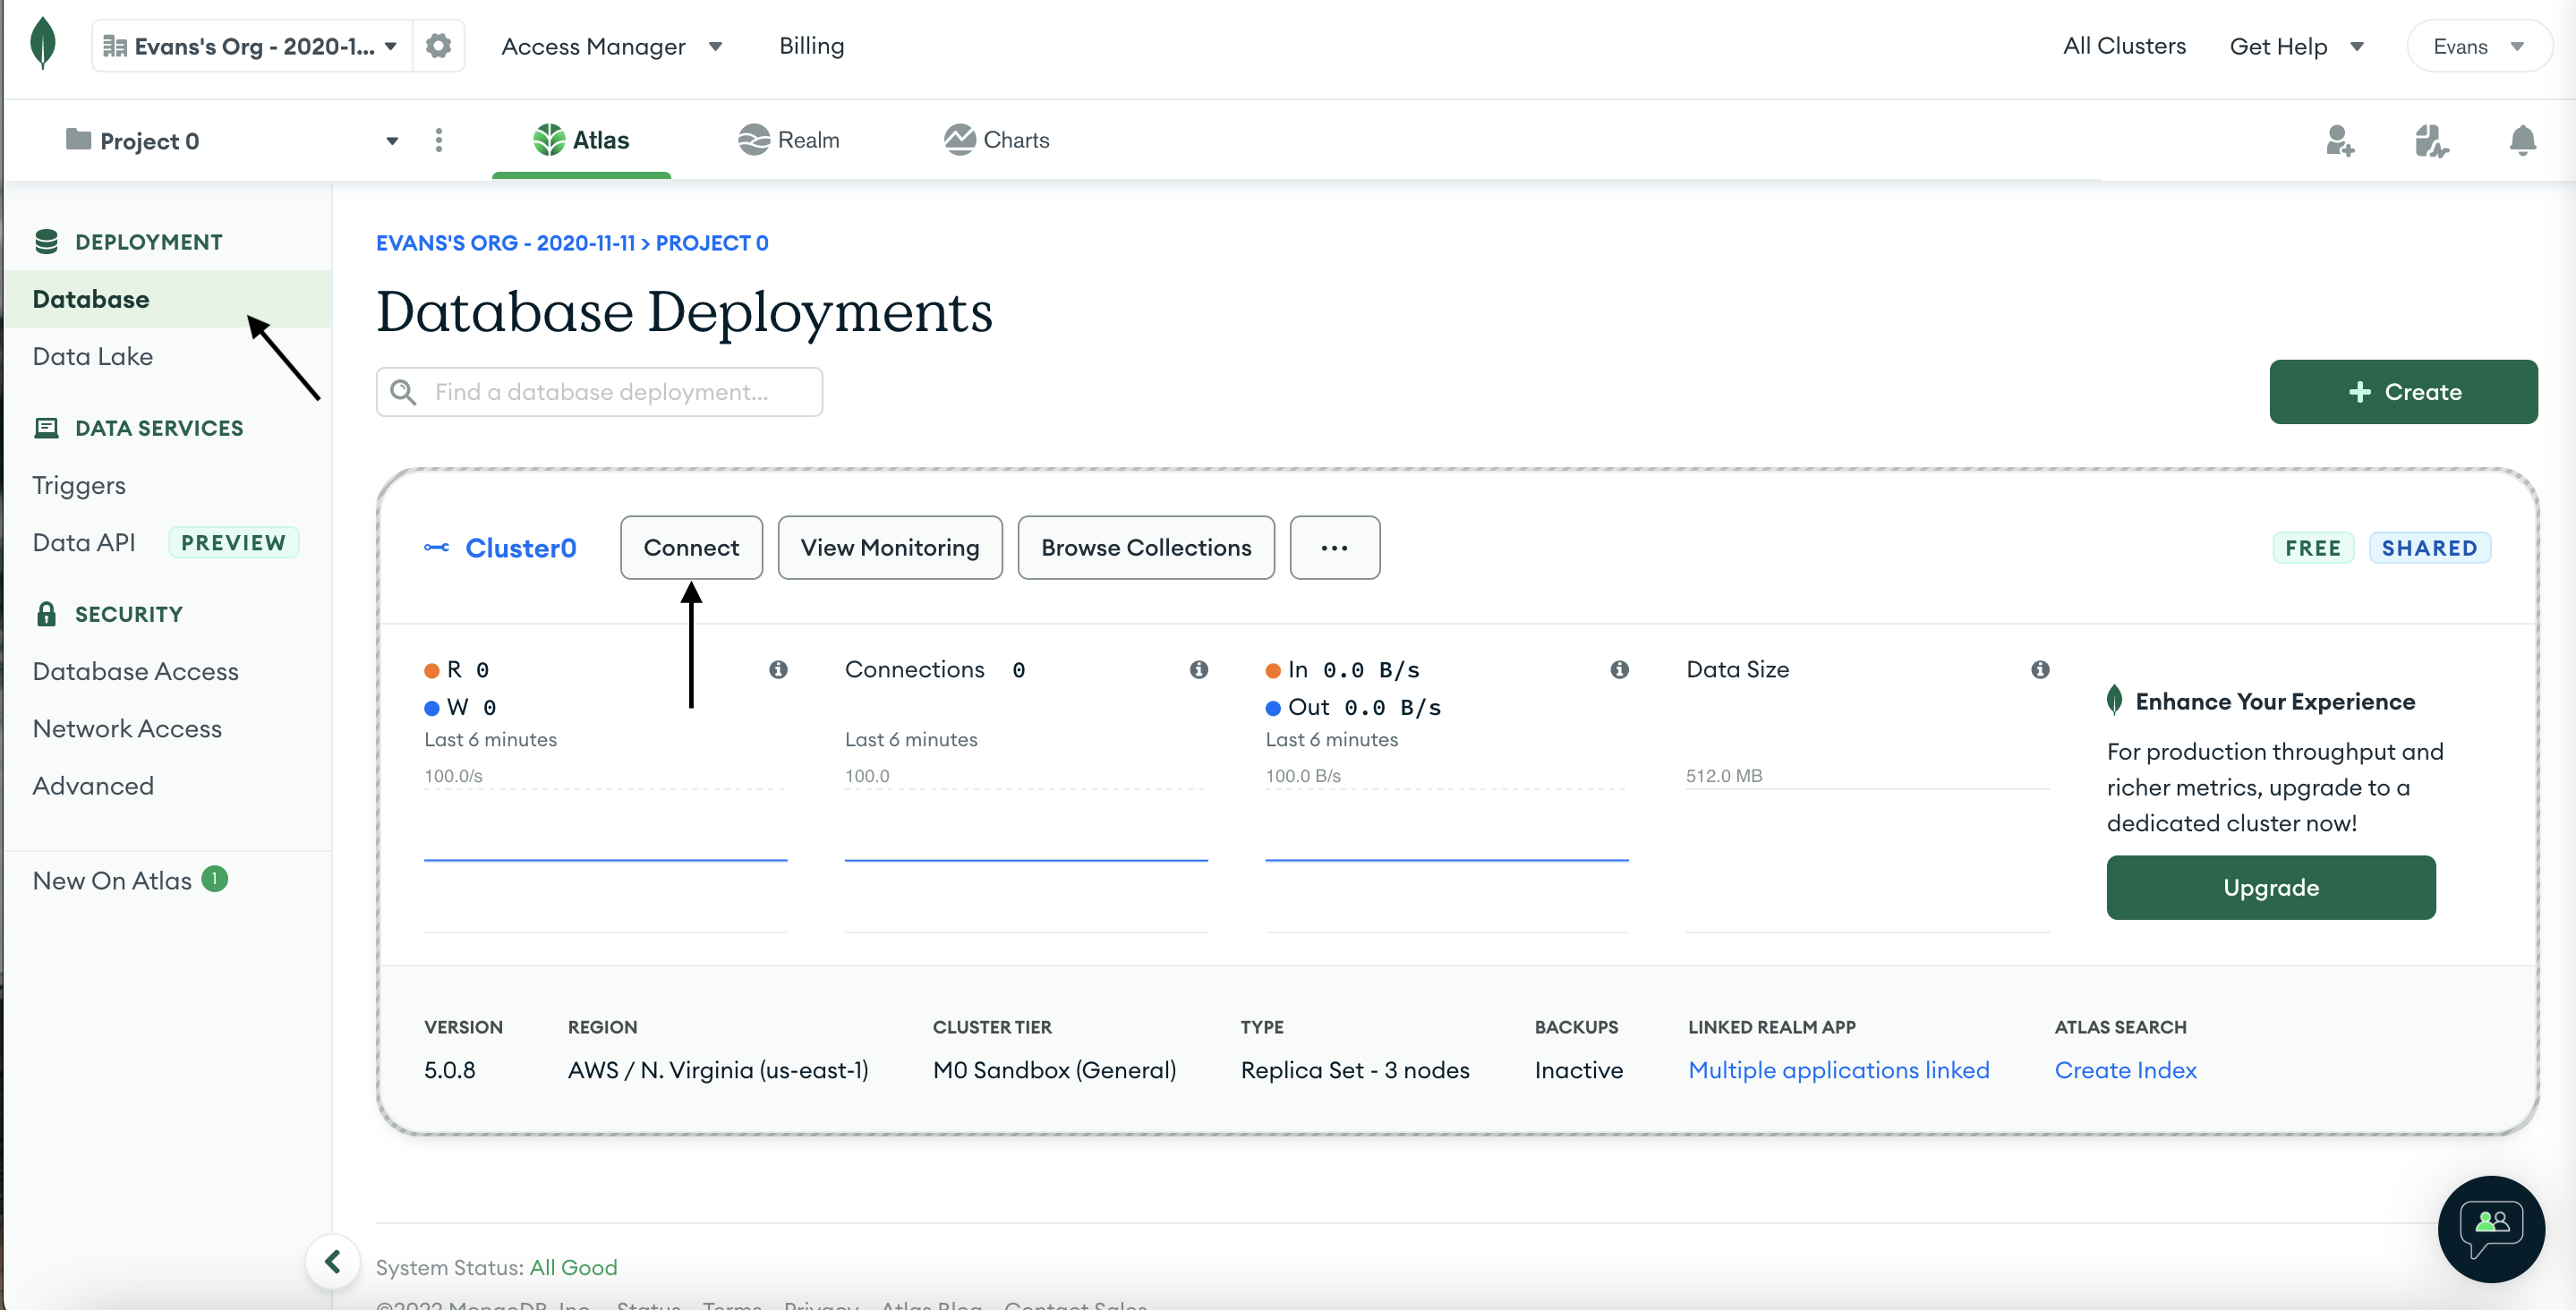
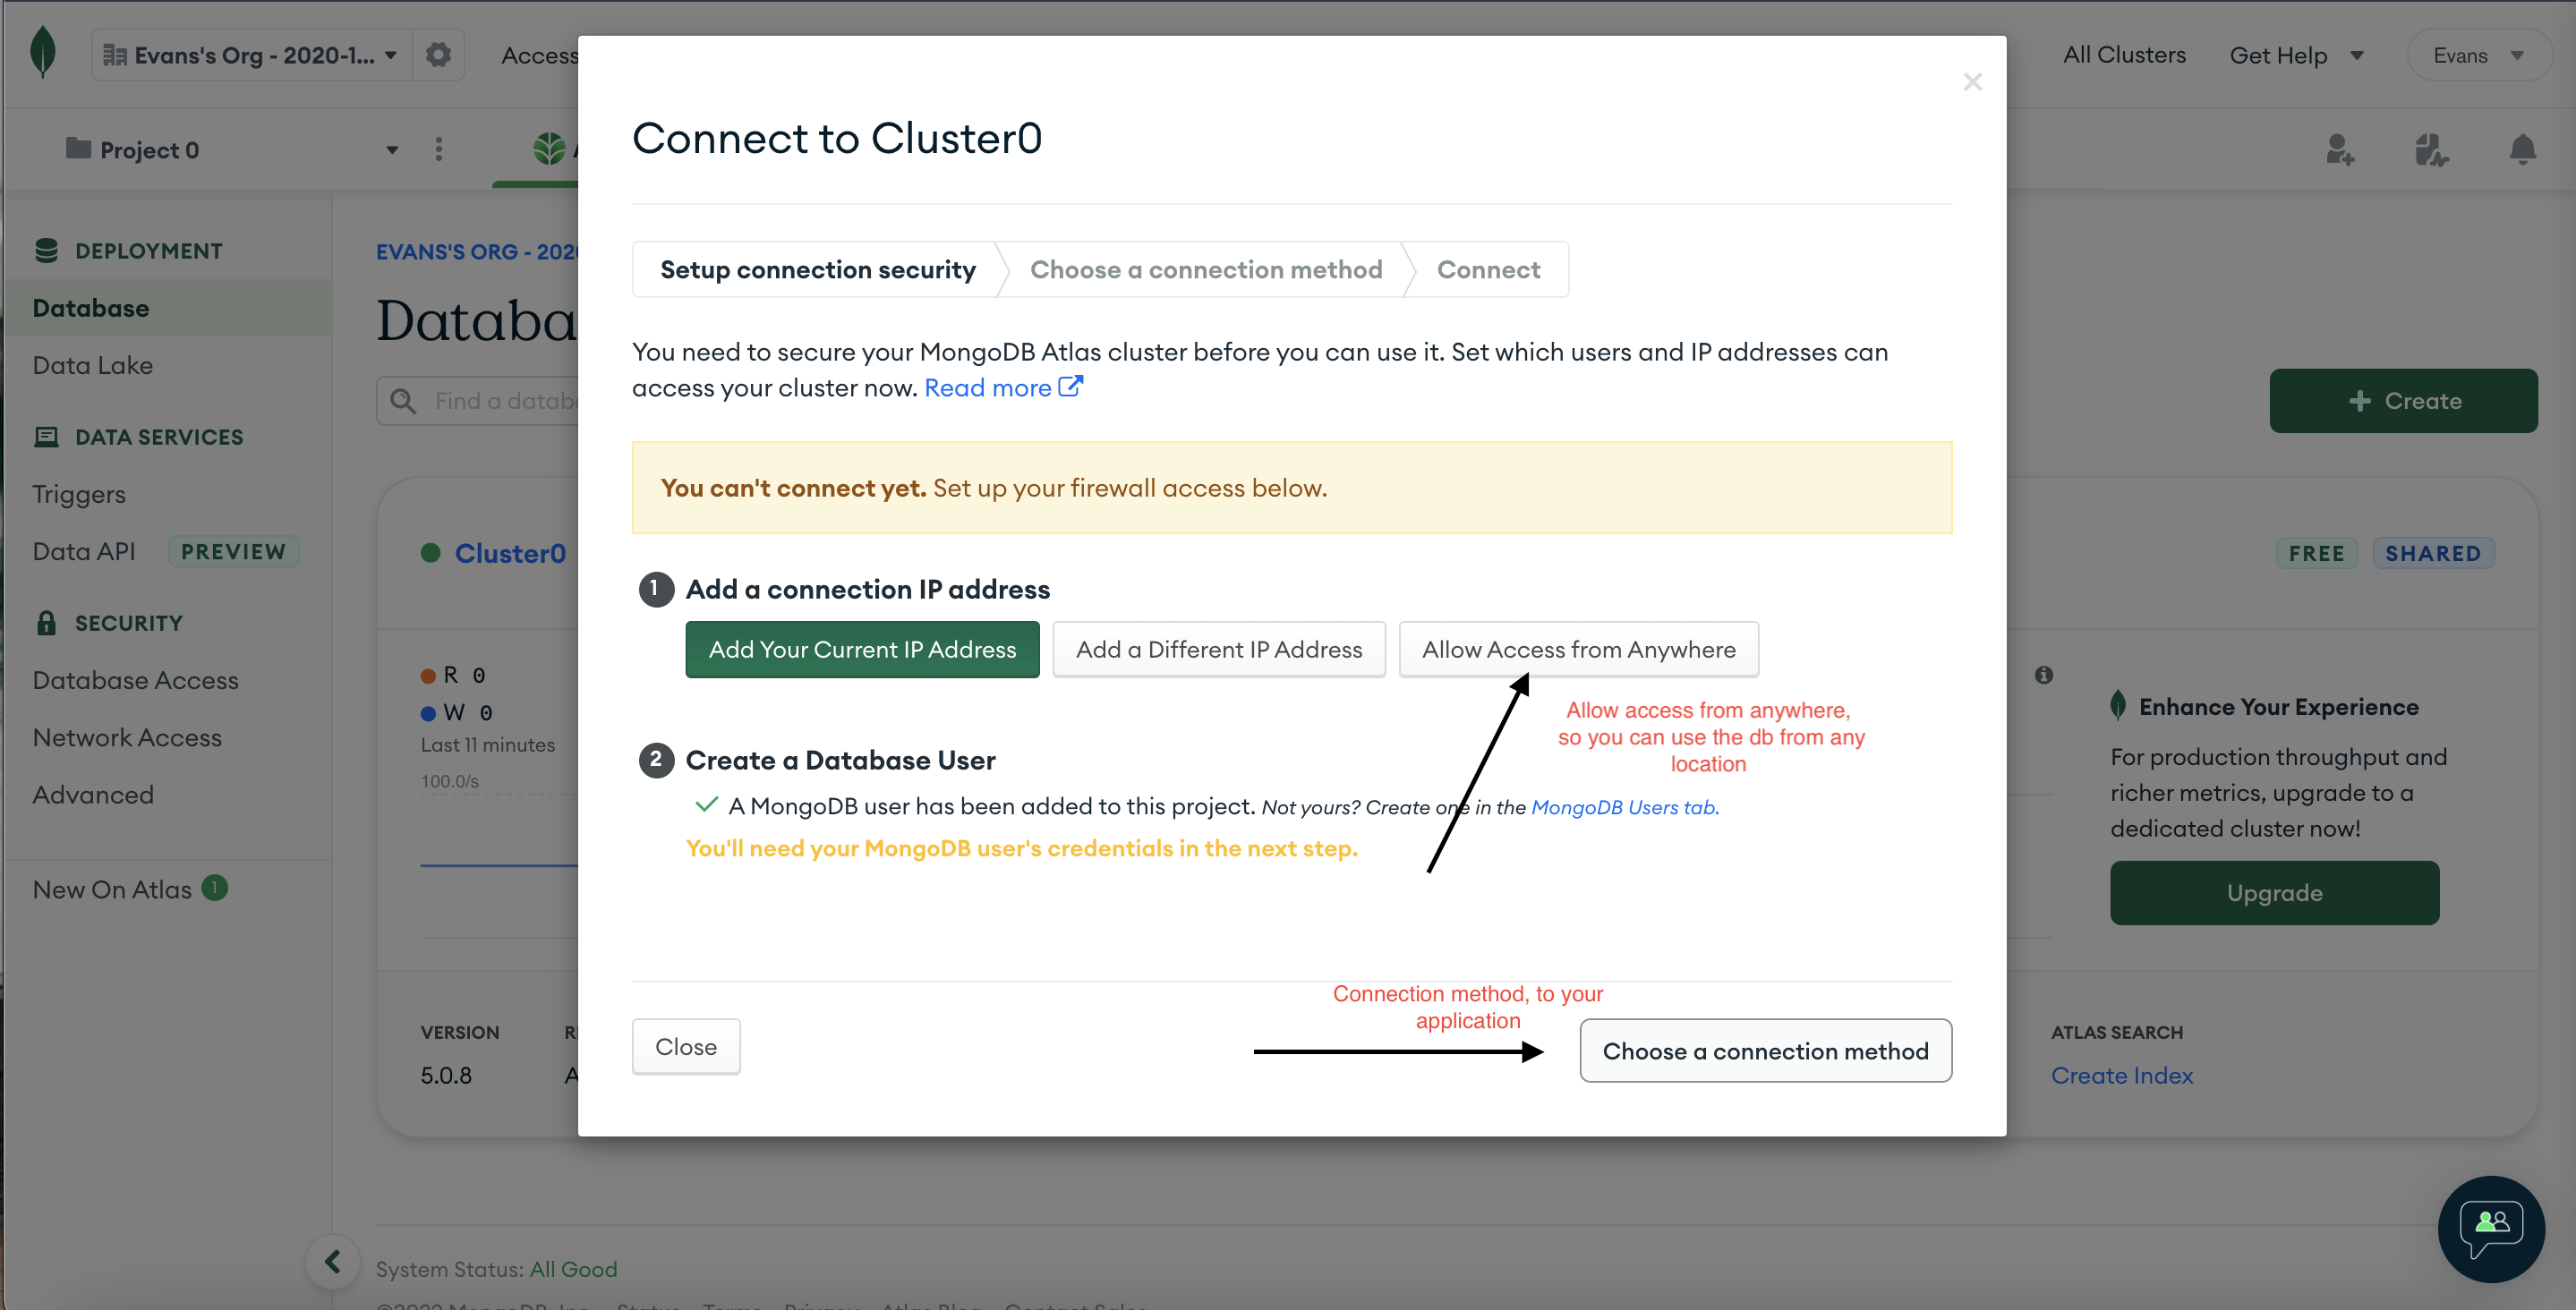
We can then connect to the database. Navigate back to Mongo Atlas dashboard and click on connect
It should take you to the following page, click on allow ip address from anywhere and then ADD. Secondly click on choose a connection method.
After clicking on choose a connection method, it should take you to the page where you can select the connection method.
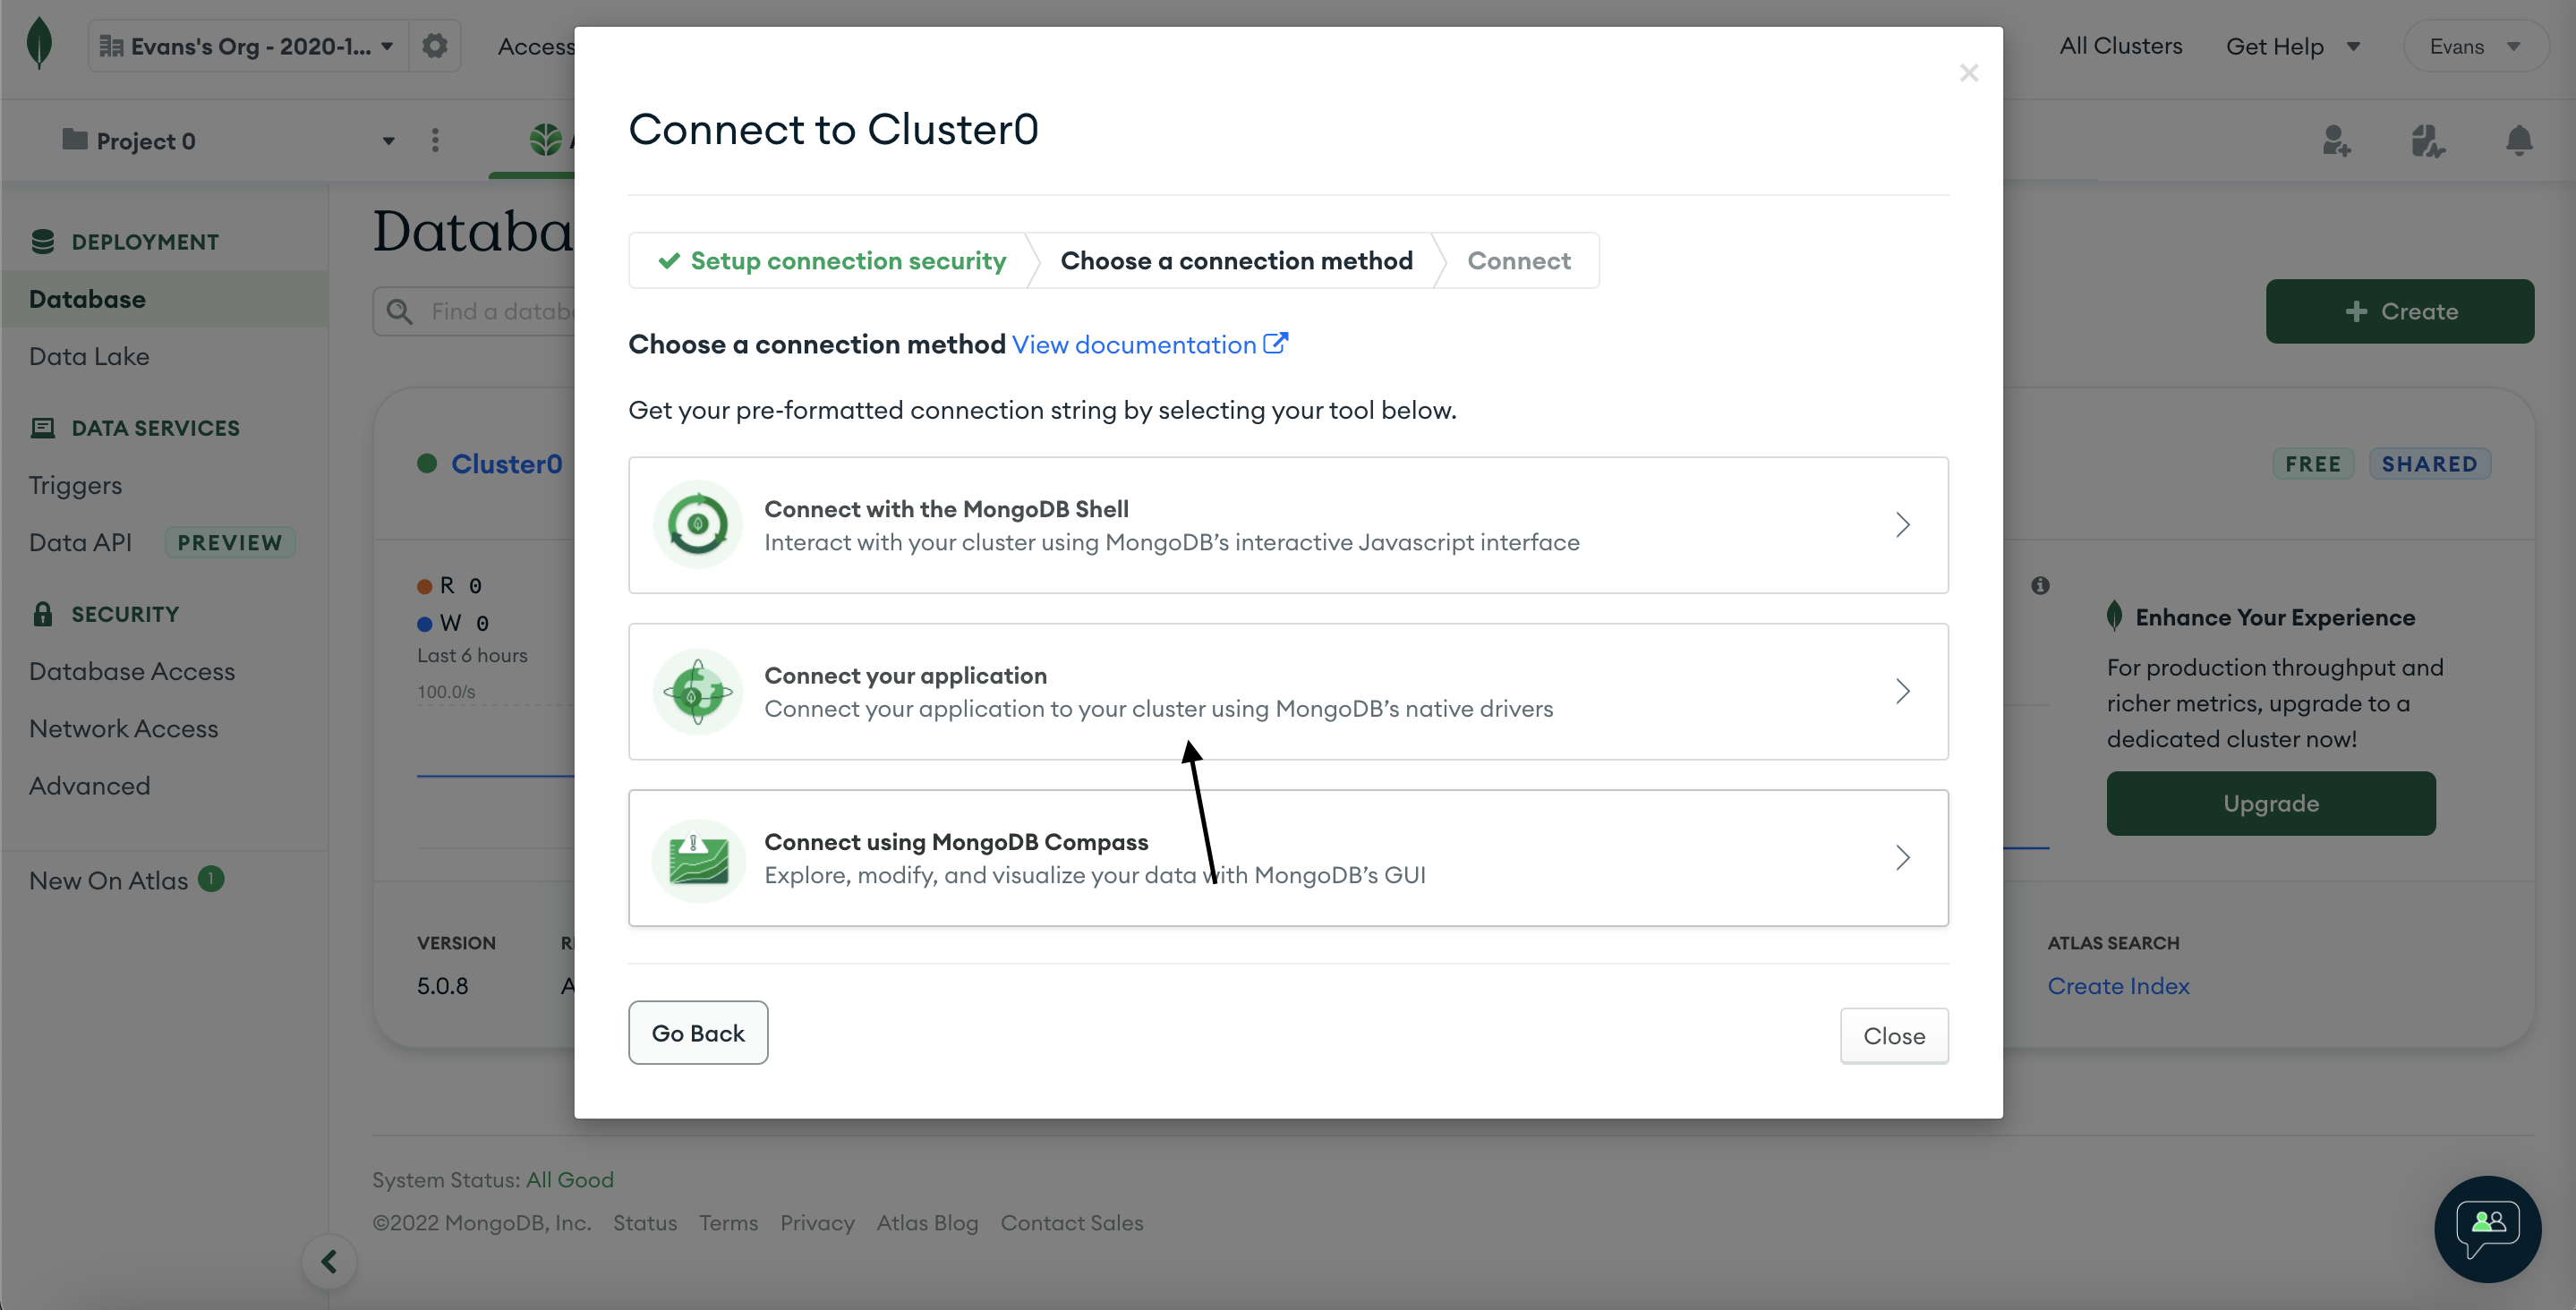
Click on ** Connect to your application ** Which should take you to the page below
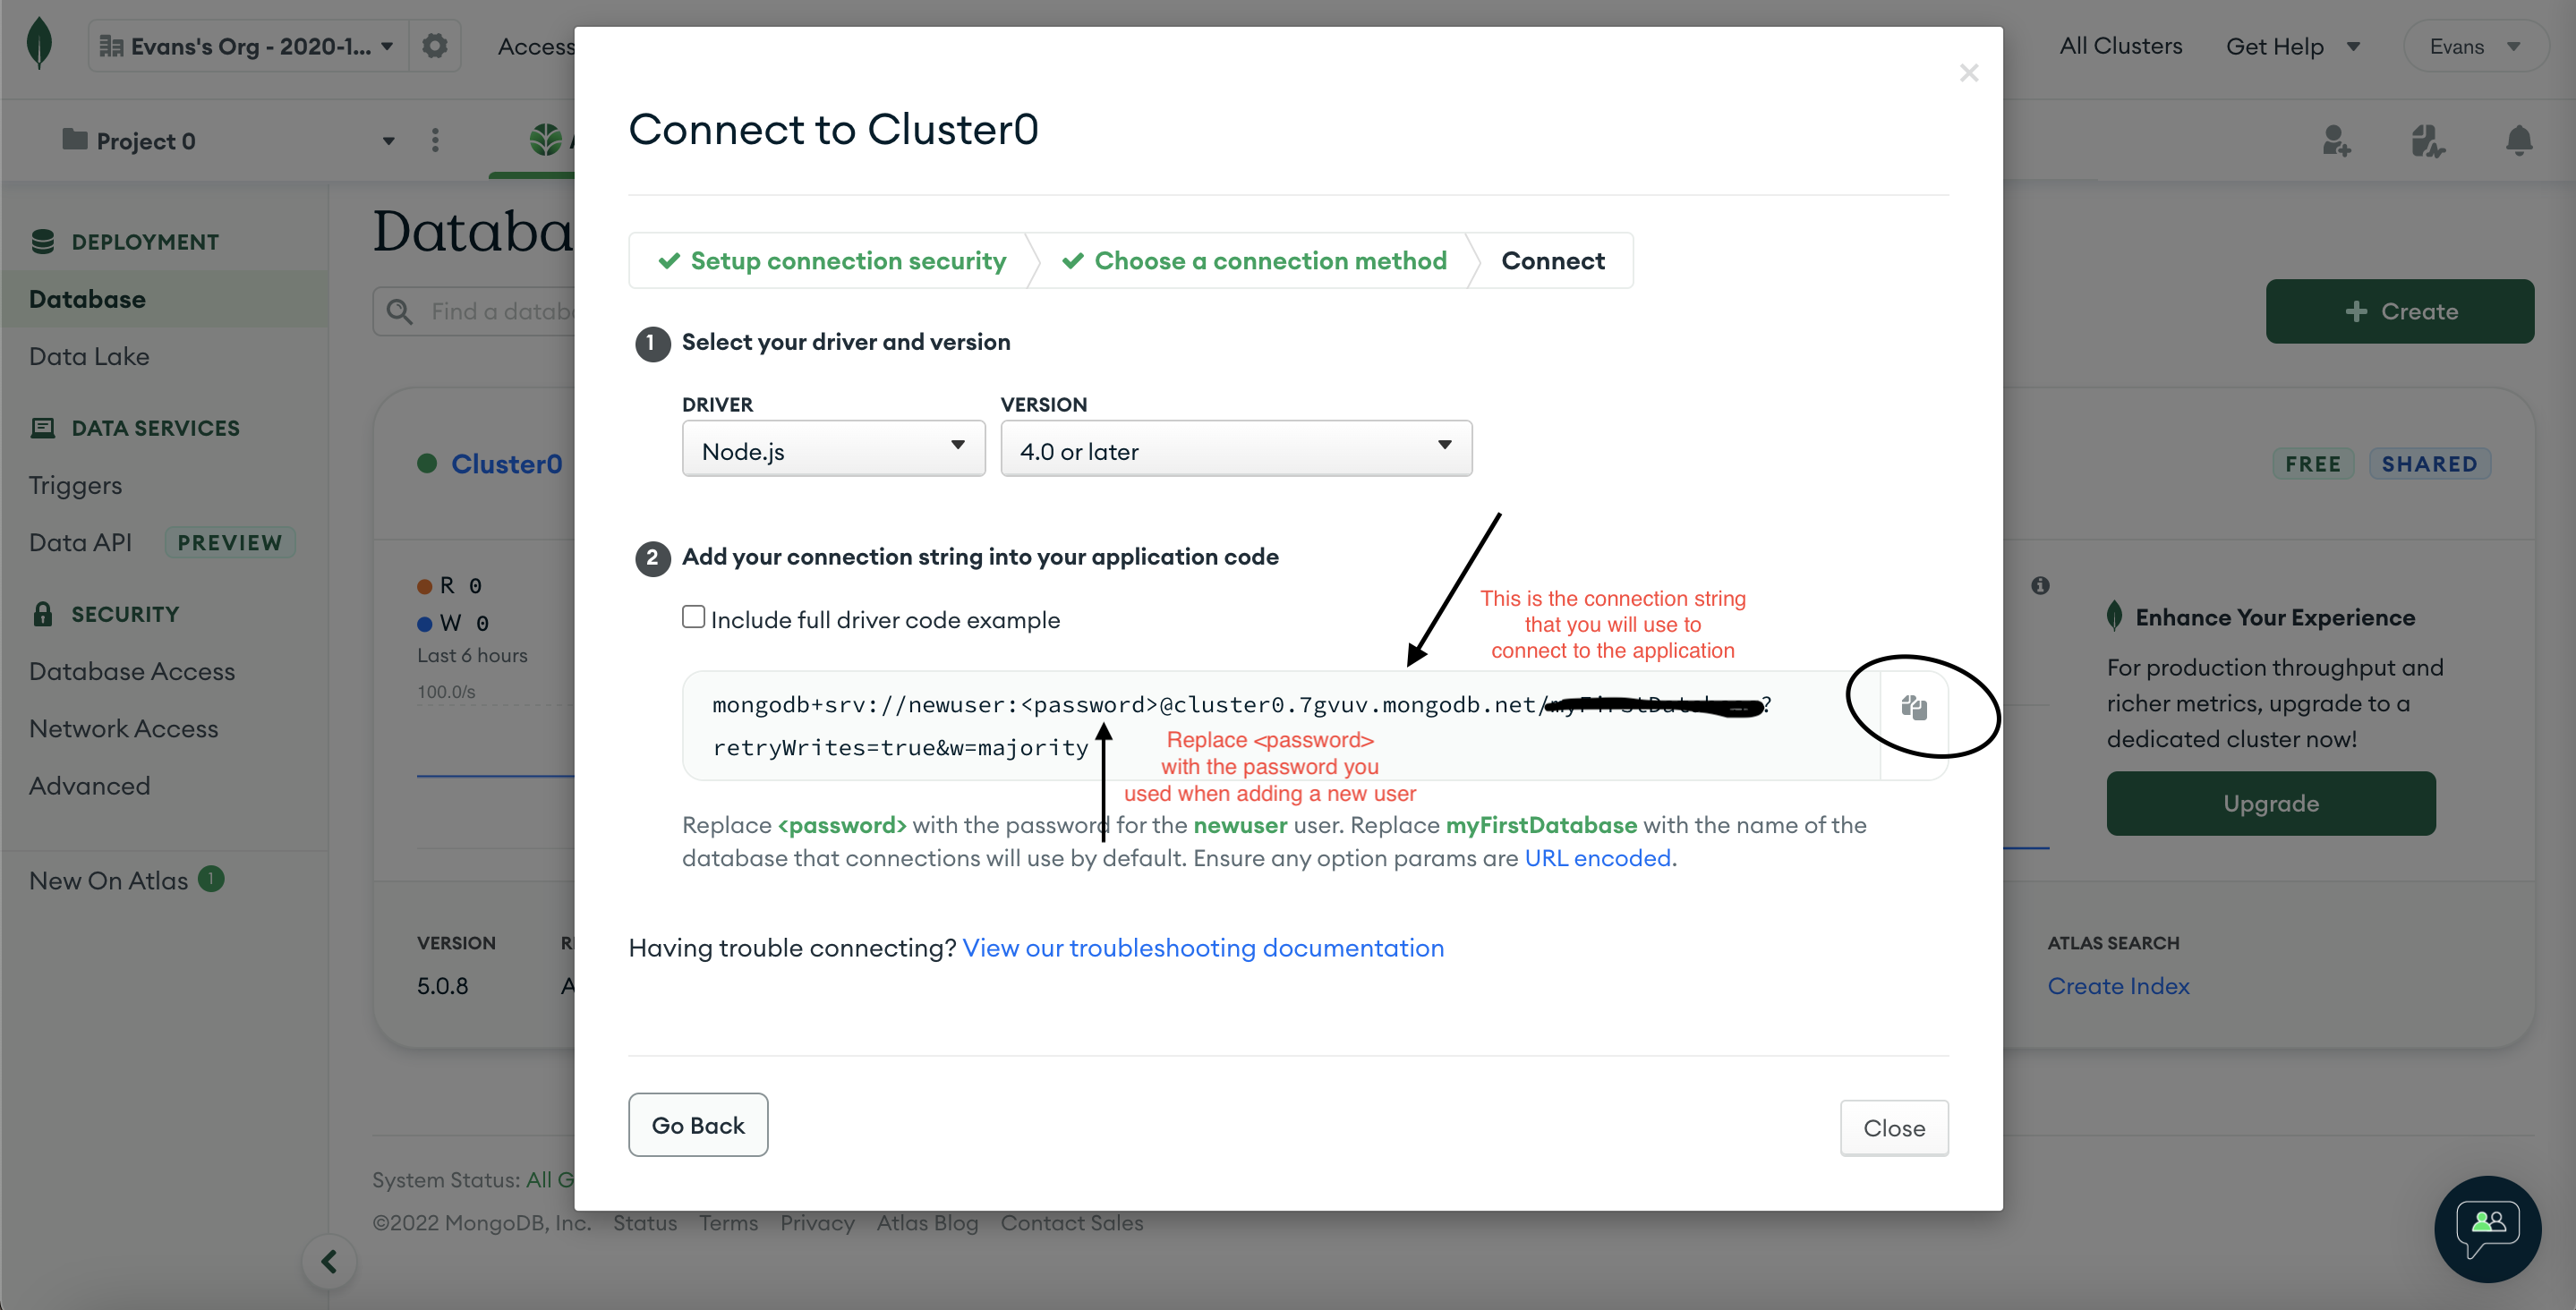
Copy the string and open getDbConnection.js file and replace the dbUrl with the string you just copied
const dbUrl = 'mongodb+srv://newuser:yourpasswordhere@cluster0.7gvuv.mongodb.net/myFirstDatabase?retryWrites=true&w=majority';
Great now your getDbConnection.js file should look like this.
import mongoose from 'mongoose';

//db url, so we can connect to mongo atlas
const dbUrl = 'mongodb+srv://newuser:yourpasswordhere@cluster0.7gvuv.mongodb.net/myFirstDatabase?retryWrites=true&w=majority';

mongoose.connect(dbUrl, {
    useNewUrlParser: true,
    useUnifiedTopology: true,
});
const db = mongoose.connection;
db.on("error", console.error.bind(console, "CONNECTION ERROR:"));
db.once("open", () => {console.log("DATABASE CONNECTED")});

const phoneSchema = new mongoose.Schema({
    name: {
        type: String
    },
    brand: {
        type: String,
        enum : [  "Samsung",
        "Nokia",
        "Apple",
        "OTHER"],
    },
    hardware: {
        type: String
    },
    isQuality: {
        type: Boolean
    },
    reviews: {
        type: Array
    }
});

const Phones = mongoose.model('phones', phoneSchema);

export { Phones };
Now you should be able to connect to the database. Let's move on to the resolvers.js file so we can implement the functions to communicate with the Database. Open resolvers.js file and import the database:
import {Phones} from './getDBConnection';
Now let's create the query root in the resolver
// resolver map
export const resolvers = {
       Query: {
        getOnePhone: (root, { id }) => {
            return new Promise(( resolve, object) => {
                Phones.findById(id, (err, phone) => {
                    if (err) reject(err)
                    else resolve(phone)
                })
            })
        },
    },
   // code goes here
};
But before this will work we need to import the resolvers.js file and add it to the schema to make it executable. Open schema.js file and import the resolvers.
import { resolvers } from './resolvers';
Good now add it below to typeDefs
const schema = makeExecutableSchema({ typeDefs ,resolvers});
And now add the query defined in resolvers.js file to the schema. Add this code in the schema below the Brands type:
  type Query {
        getOnePhone(id: ID): Phone
   }
In the above query type, we are using the id to find the phone and return it.
Now we are done setting up the basic architecture. To make this work, we need to add the schema to the entry file to be able to send HTTP requests to **/graphql **. Open index.js file and import the schema and **graphqlHTTP **from express-graphql :
import { graphqlHTTP }  from 'express-graphql';
import { schema } from './data/schema';
Now let's configure the route with graphqlHTTP and pass the schema to it.
app
.use('/graphql', graphqlHTTP({
    schema: schema,
    graphiql: true
}));
As you can see in above we are using graphiql: true, It's a package that helps us to interact with GraphQL in-browser, you can install it with npm
npm i graphiql
After this is installed, start the server and navigate to ** http://localhost:5050/graphql**, you should see
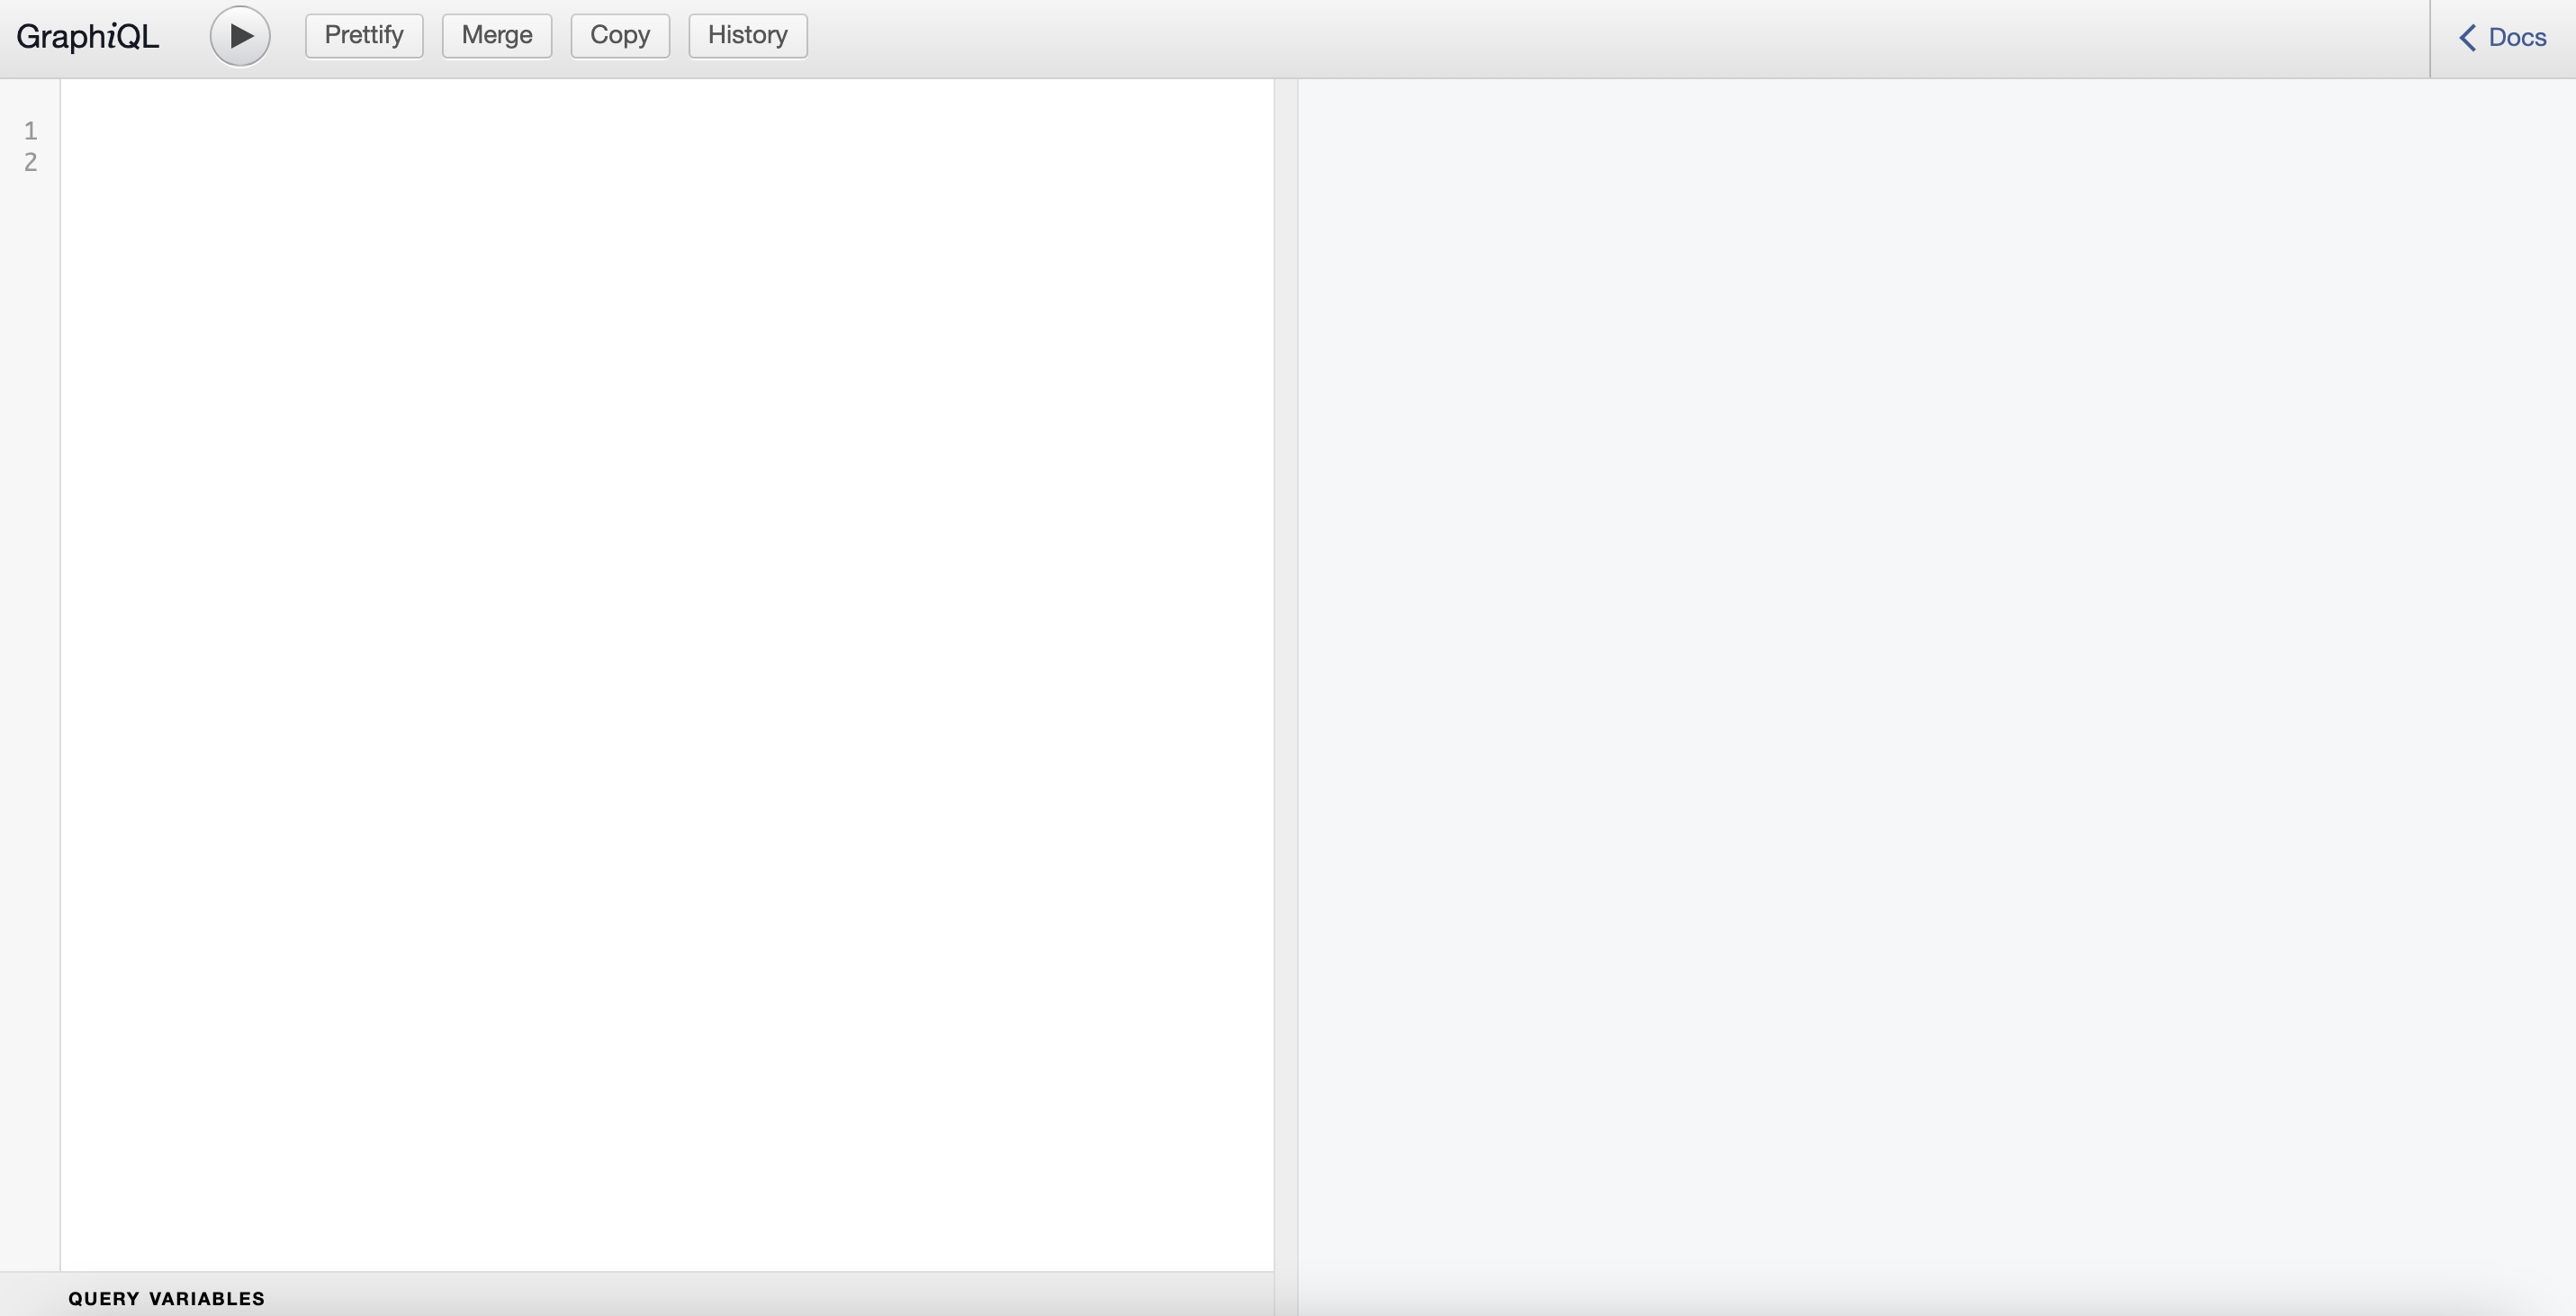
If you see this CONGRATS!! for reaching this point. We can start defining our queries and mutations and interact with it in the browser IDE.
CRUD - Implementation
If you are wondering why we had to define the query root first, this is how **GraphQL **works, we have to define the query root first. So now let's mutate the phone type to create a new phone.
C - Create
Open resolvers.js file and add the following code below the query root:
Mutation: {
    createPhone: (root, { input }) => {
        const newPhone = new Phones({
            name:input.name,
            brand: input.brand,
            hardware:input.hardware,
            isQuality:input.isQuality,
            reviews:input.reviews
        });
        newPhone.id = newPhone._id;
        return new Promise((resolve, object) => {
            newPhone.save((err) => {
                if (err) reject(err)
                else resolve(newPhone)
            })
        })
    },
// Code goes here
}
Now let's define createPhone type in the** schema.js** file since it's defined in the resolver. Open the **schema.js ** file and add this code below, preferably last line:
   type Mutation {
        createPhone(input: PhoneInput): Phone
    }
The createPhone mutation takes the phone input, so basically whatever we added on to the fields and then returns it after creating.
Now start the server if not already started and navigate to http://localhost:5050/graphql. We need to create the mutation in the browser. The phone input takes name, brand, hardware, isQuality and reviews - which also takes the reviewInput.
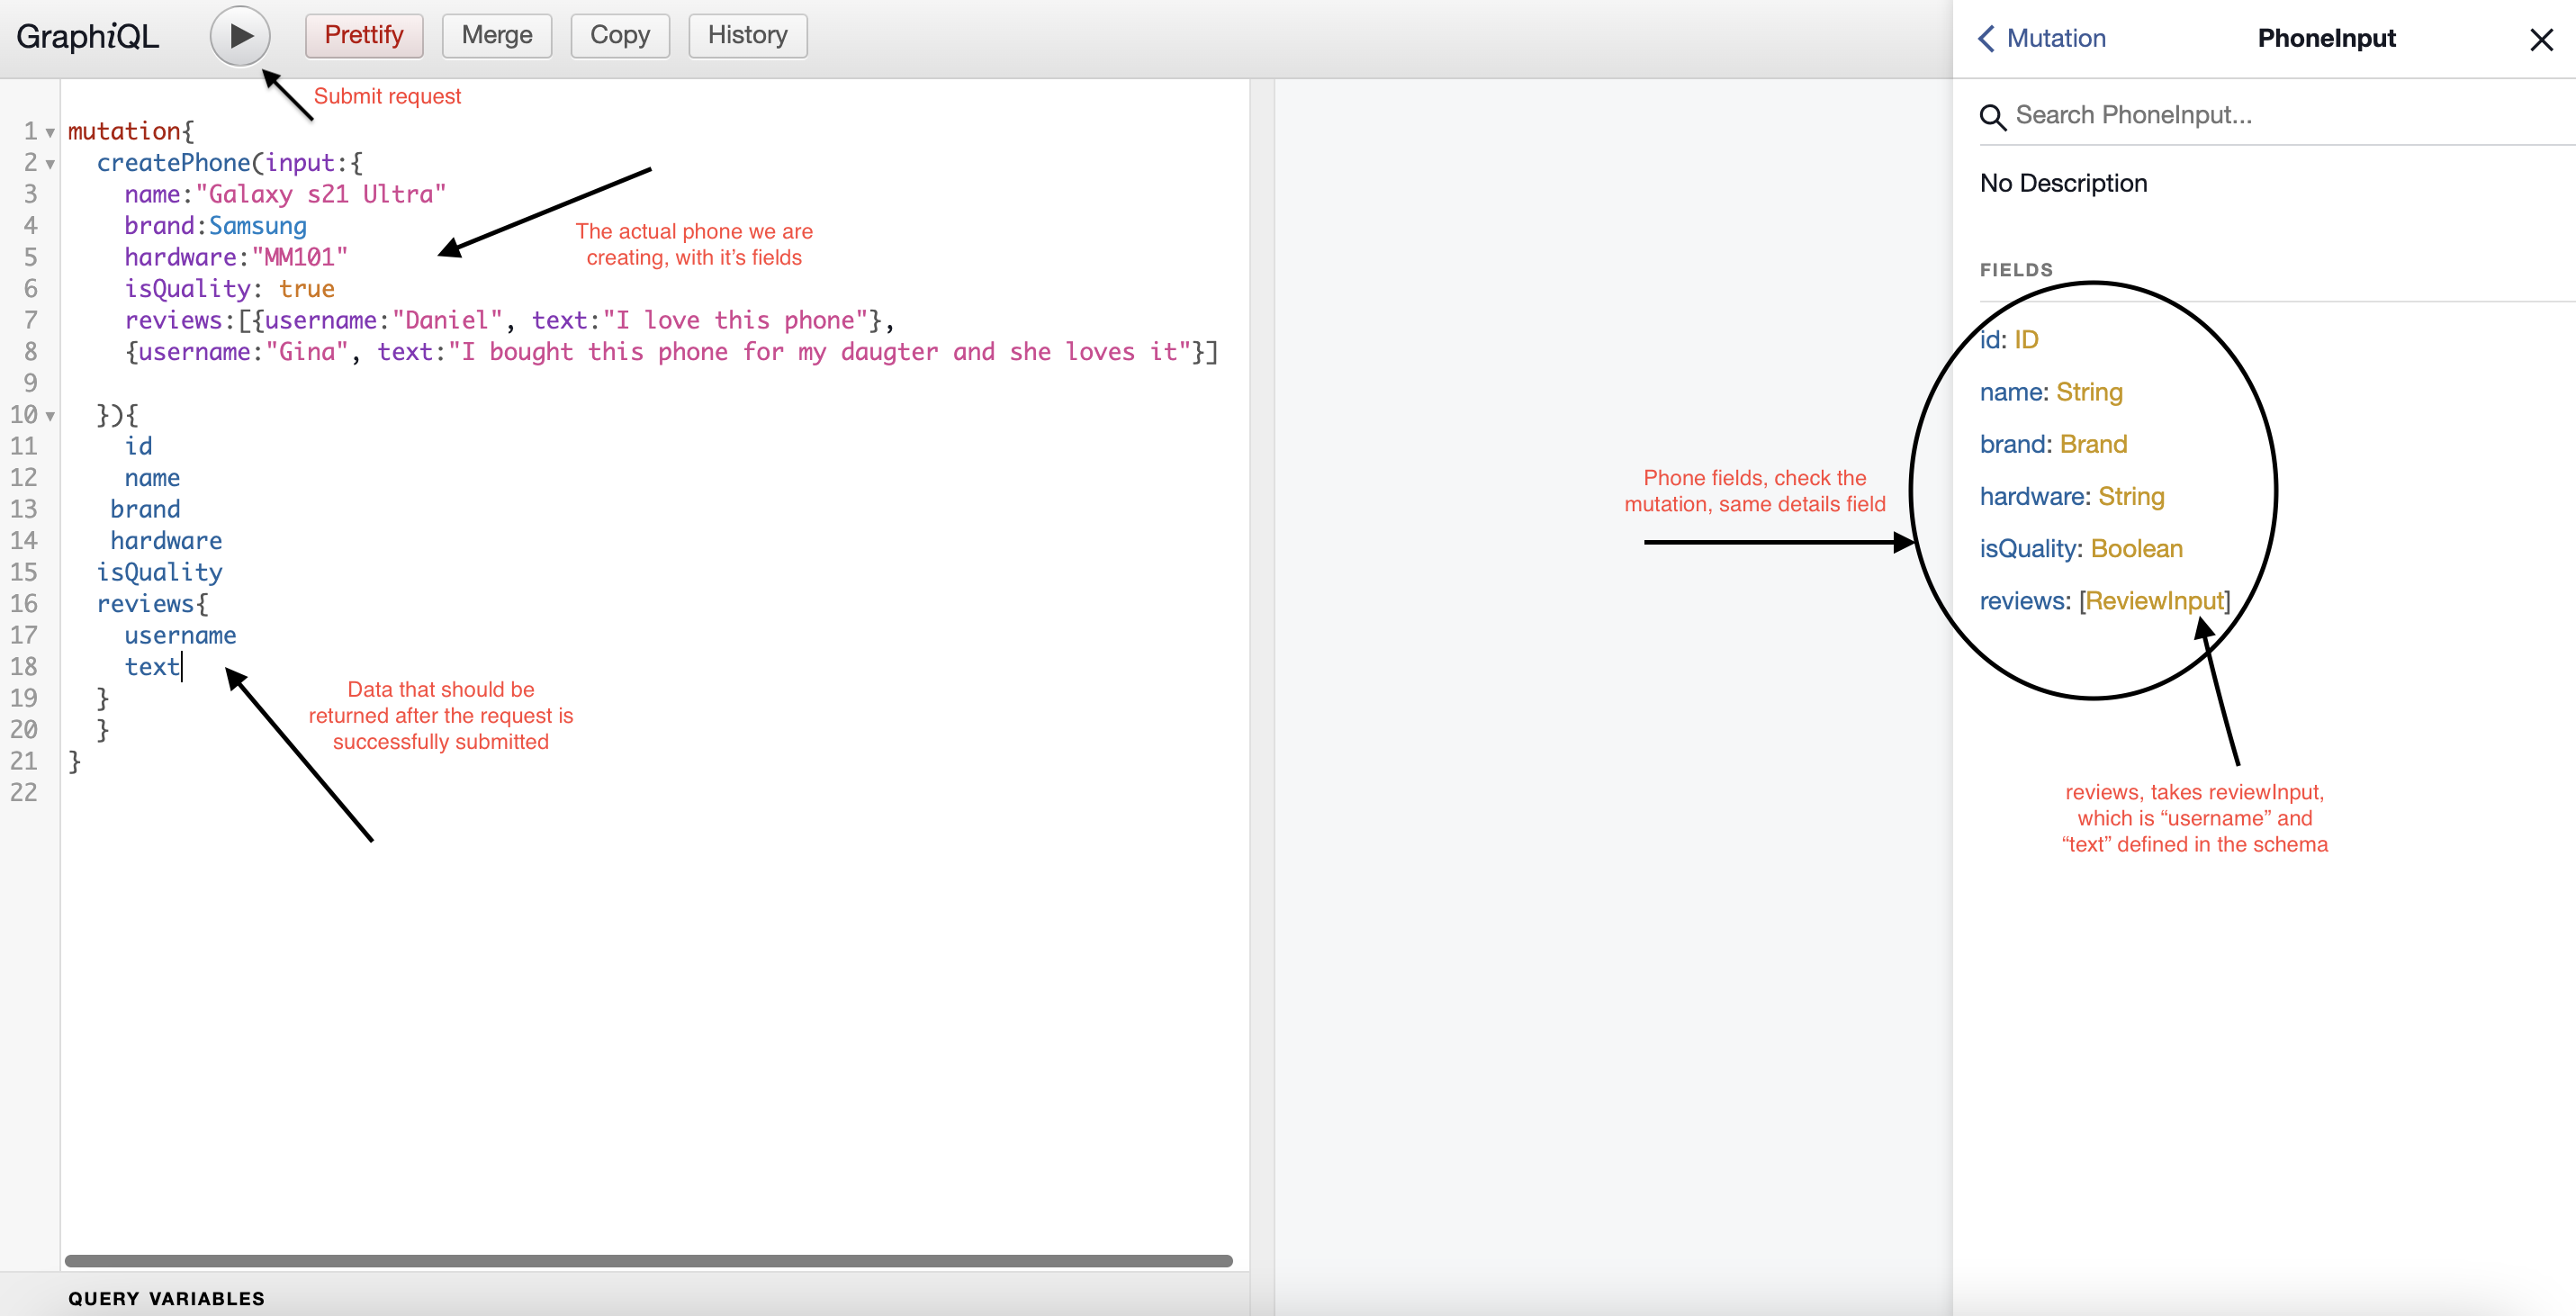
Follow the same pattern to create your own phone LoL. Or you can also use mine.
mutation{
  createPhone(input:{
    name:"Galaxy s21 Ultra"
    brand:Samsung
    hardware:"MM101"
    isQuality: true
    reviews:[{username:"Daniel", text:"I love this phone"},
    {username:"Gina", text:"I bought this phone for my daughter and she loves it"}]

  }){
    id
    name
   brand
   hardware
  isQuality
  reviews{
    username
    text
  }
  }
}
And when the request is submitted, you should get this ( image below)
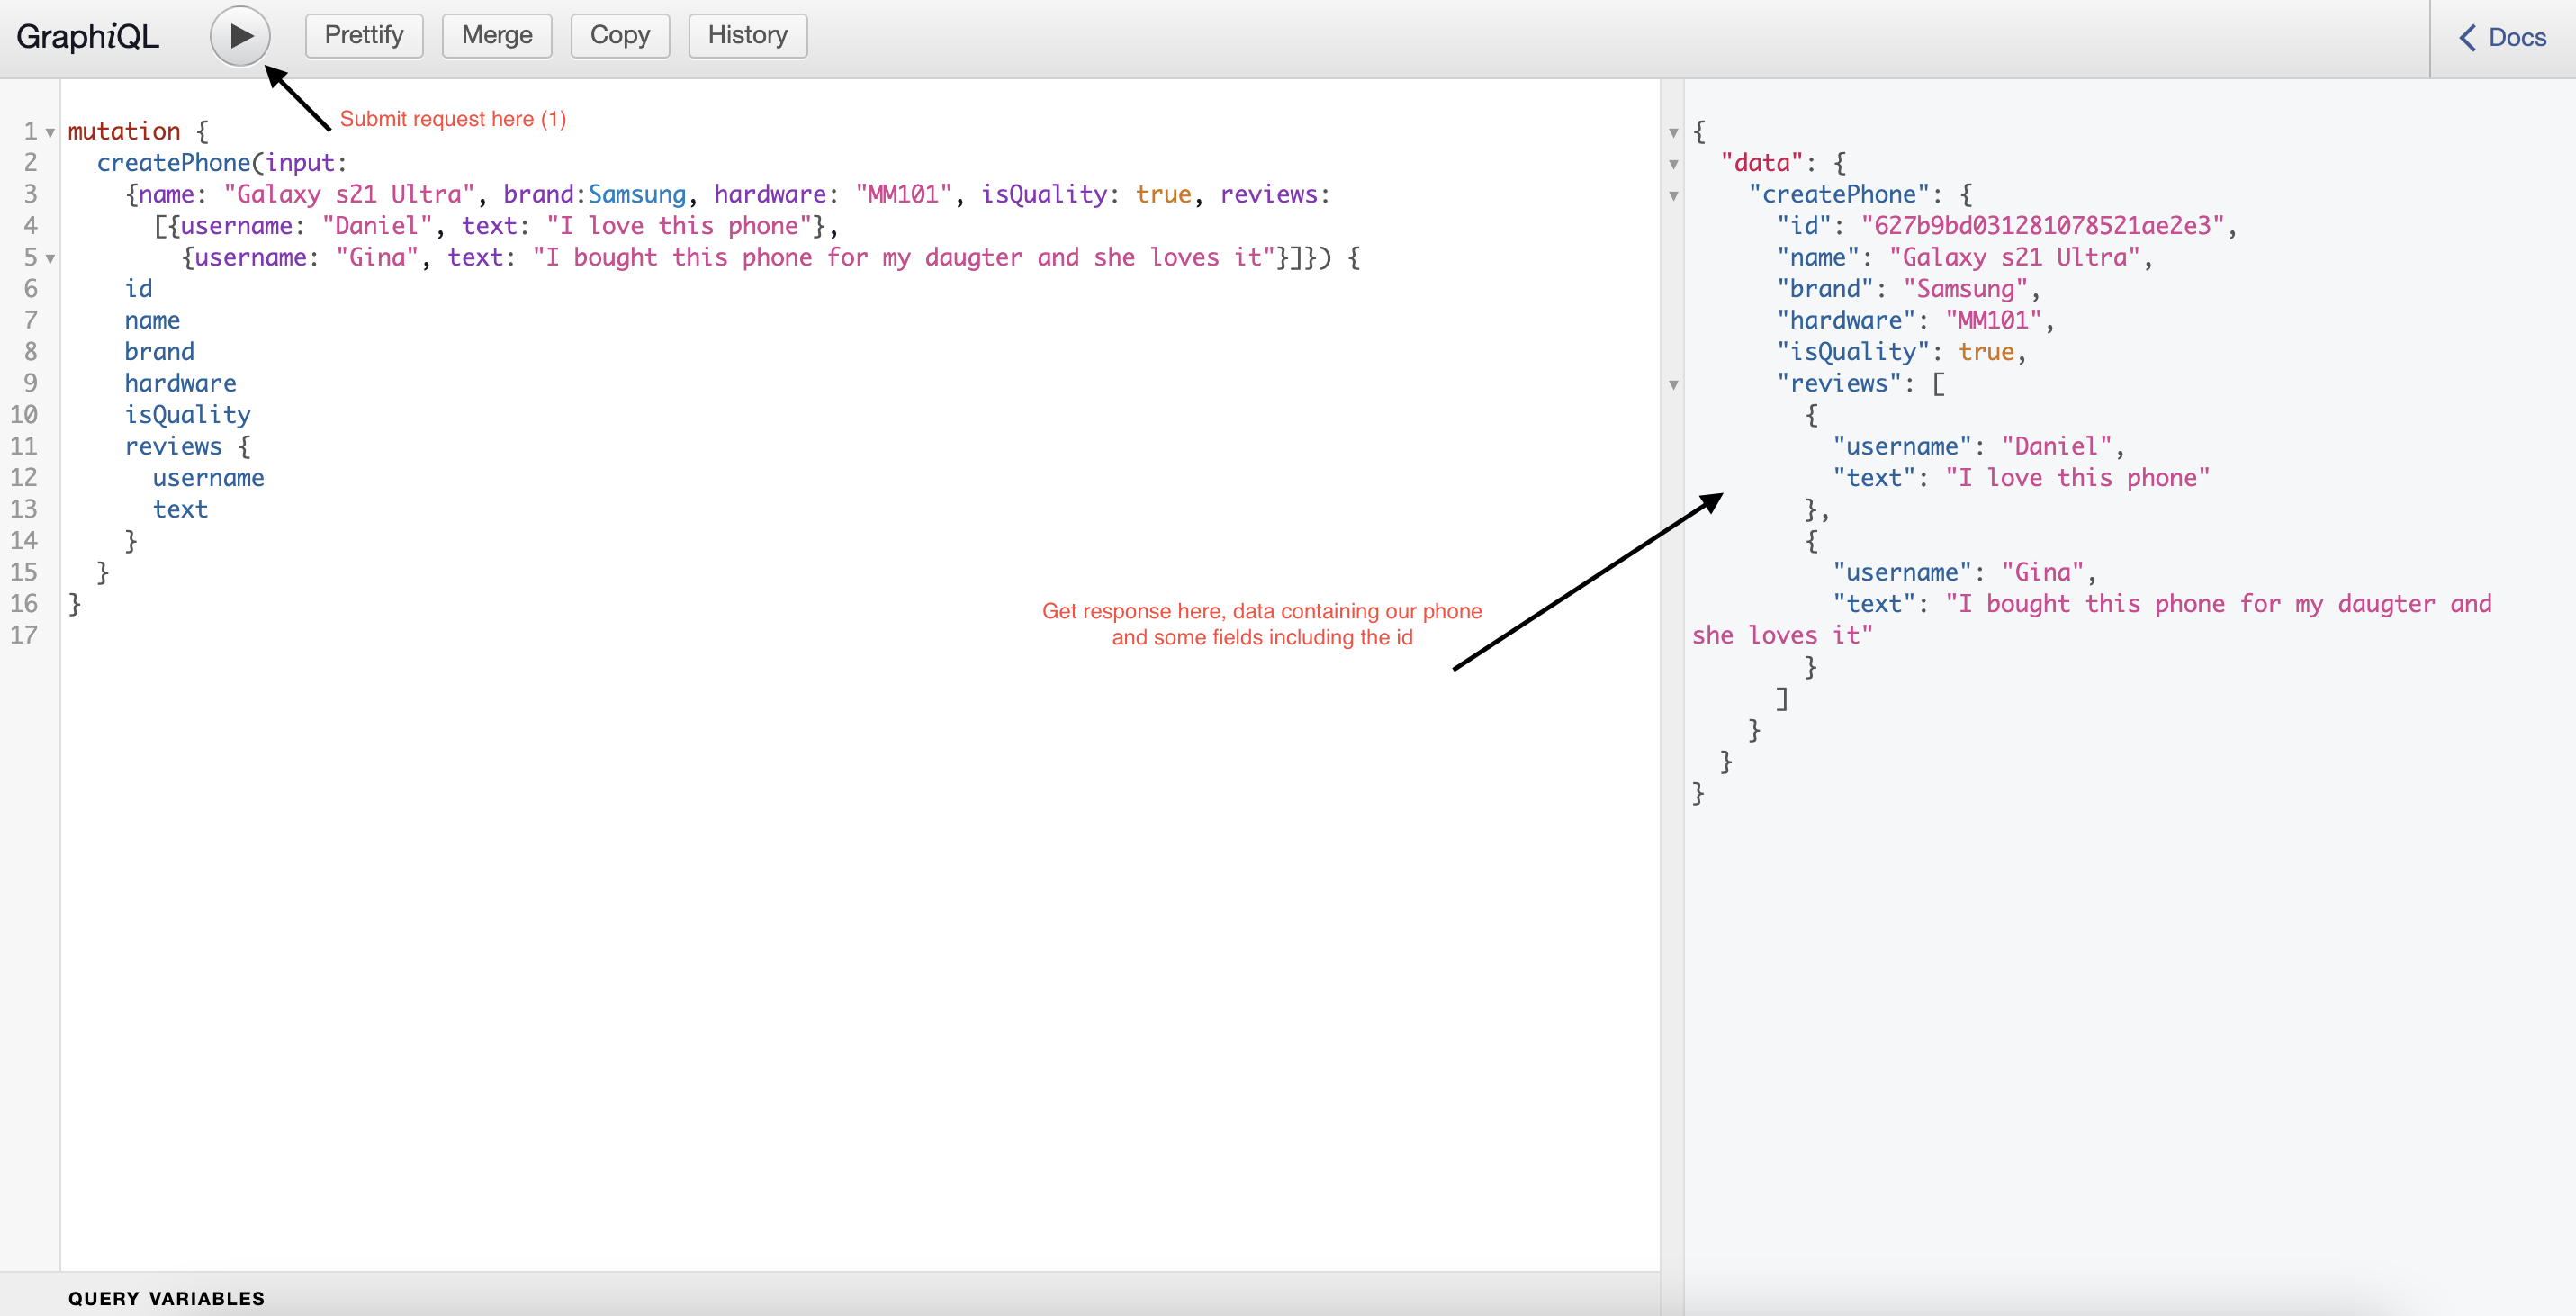
POINT 1.0 - ( Ref Point)
And when you go back to the Mongo Atlas dashboard, you will observe that the phone has been saved successfully
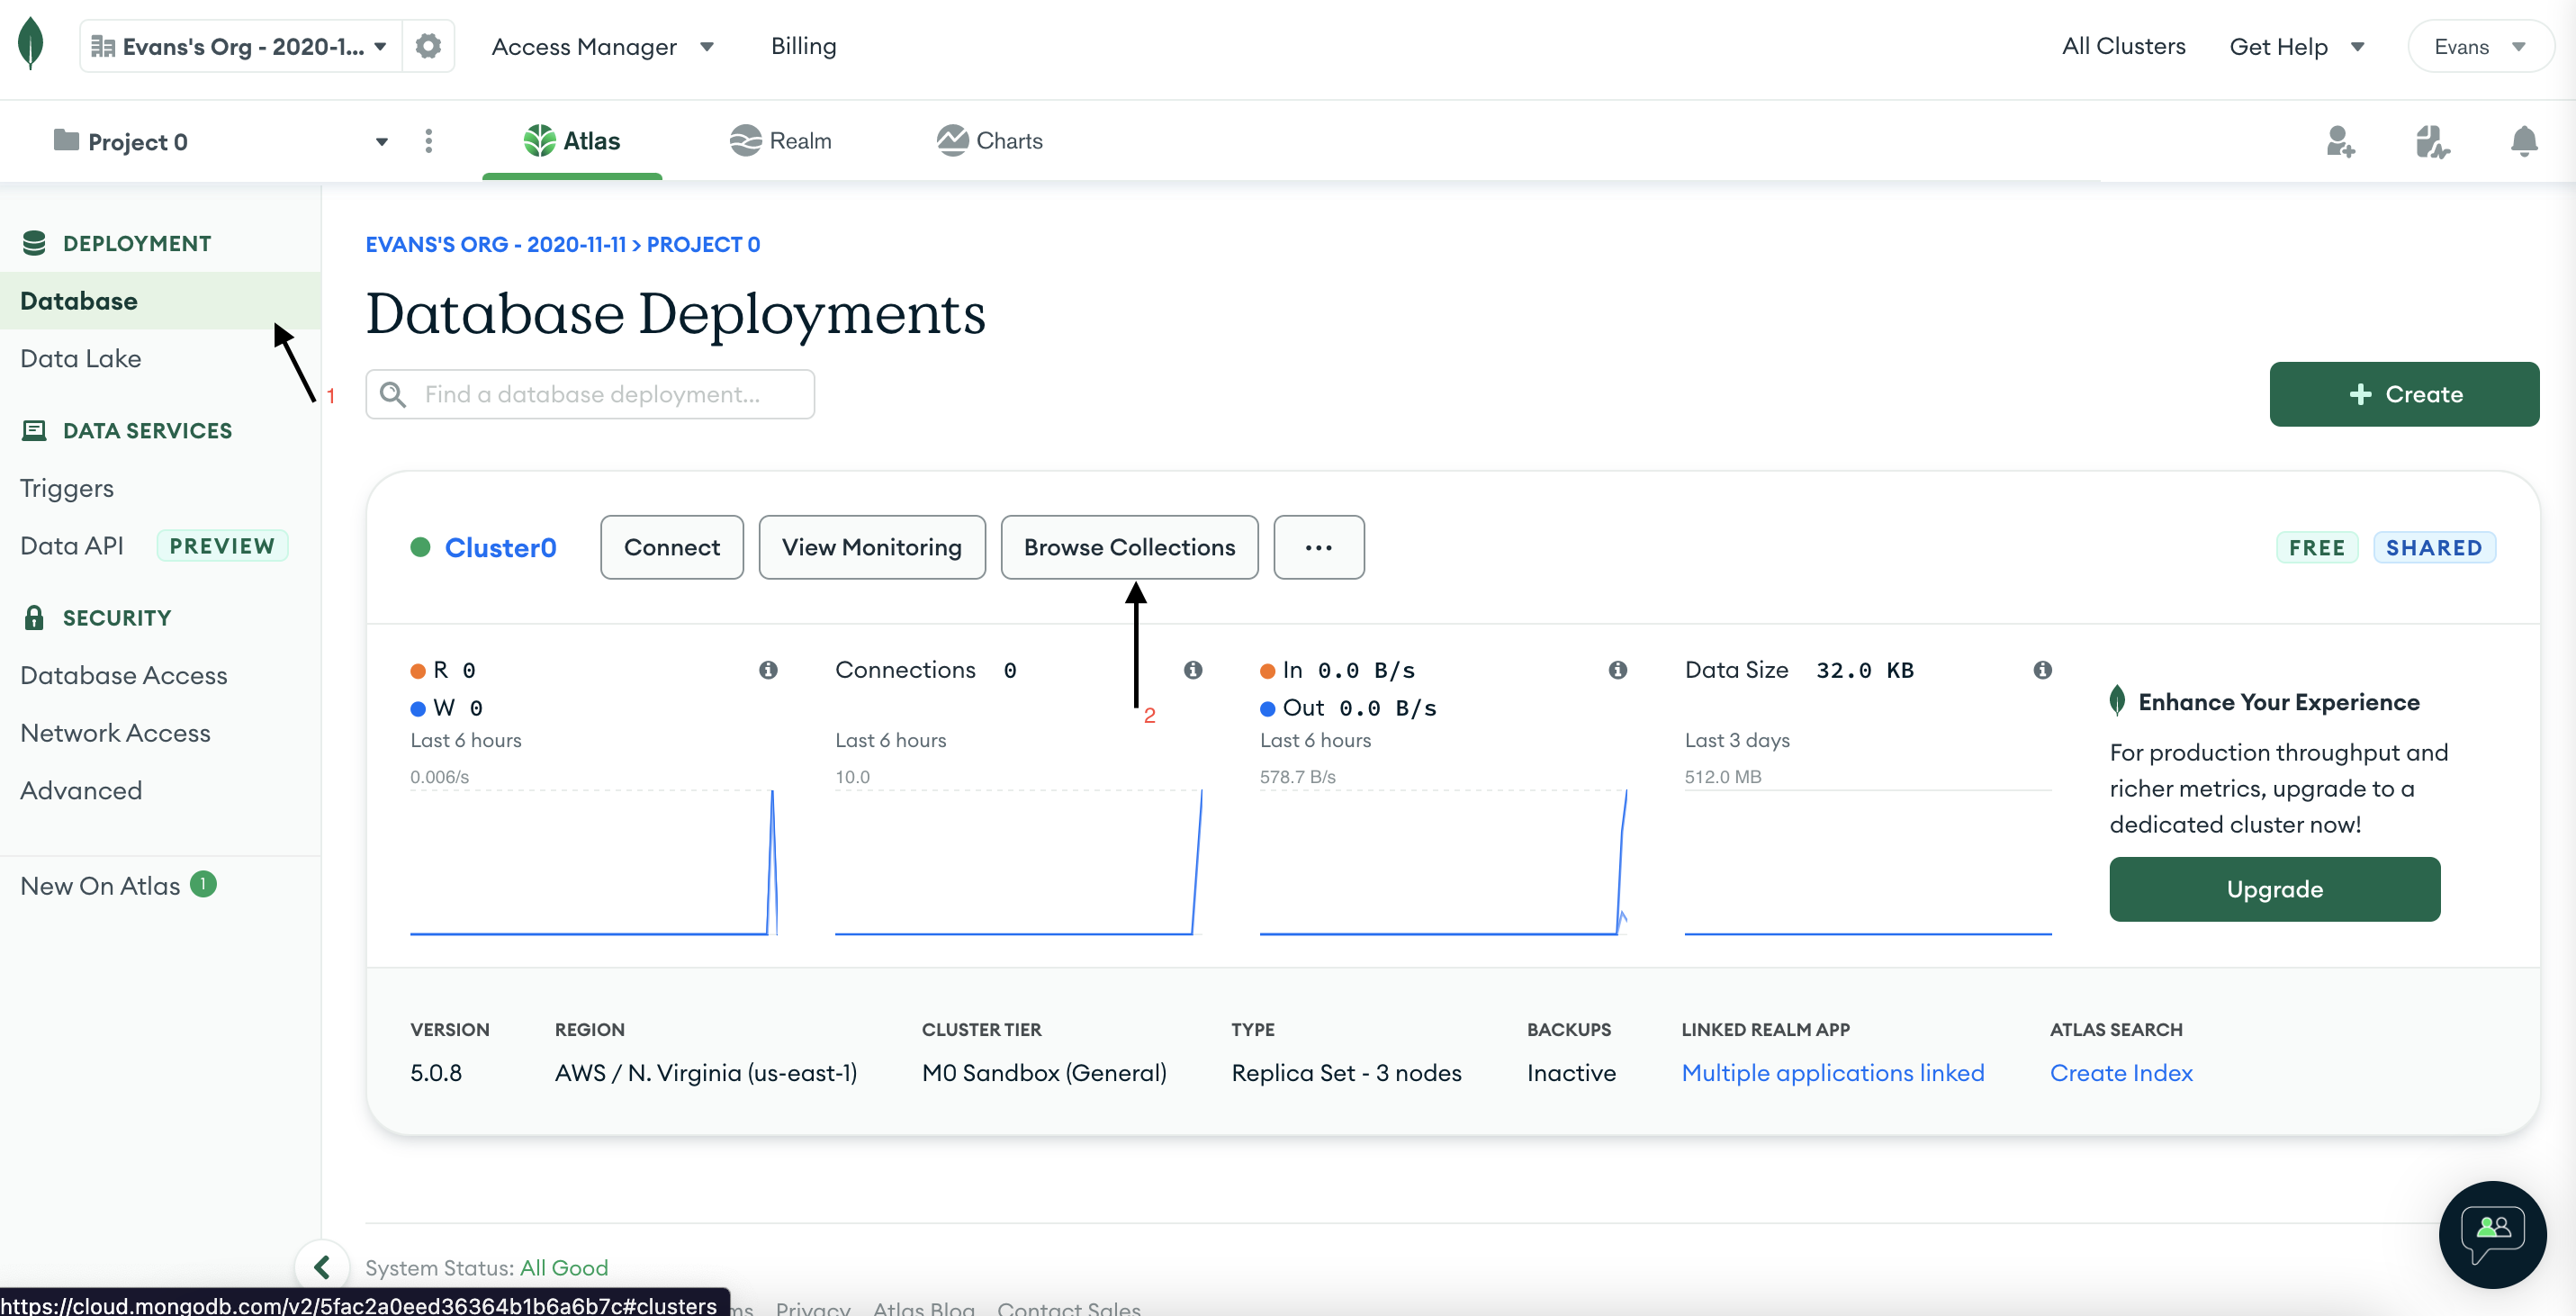
Check the phones collection
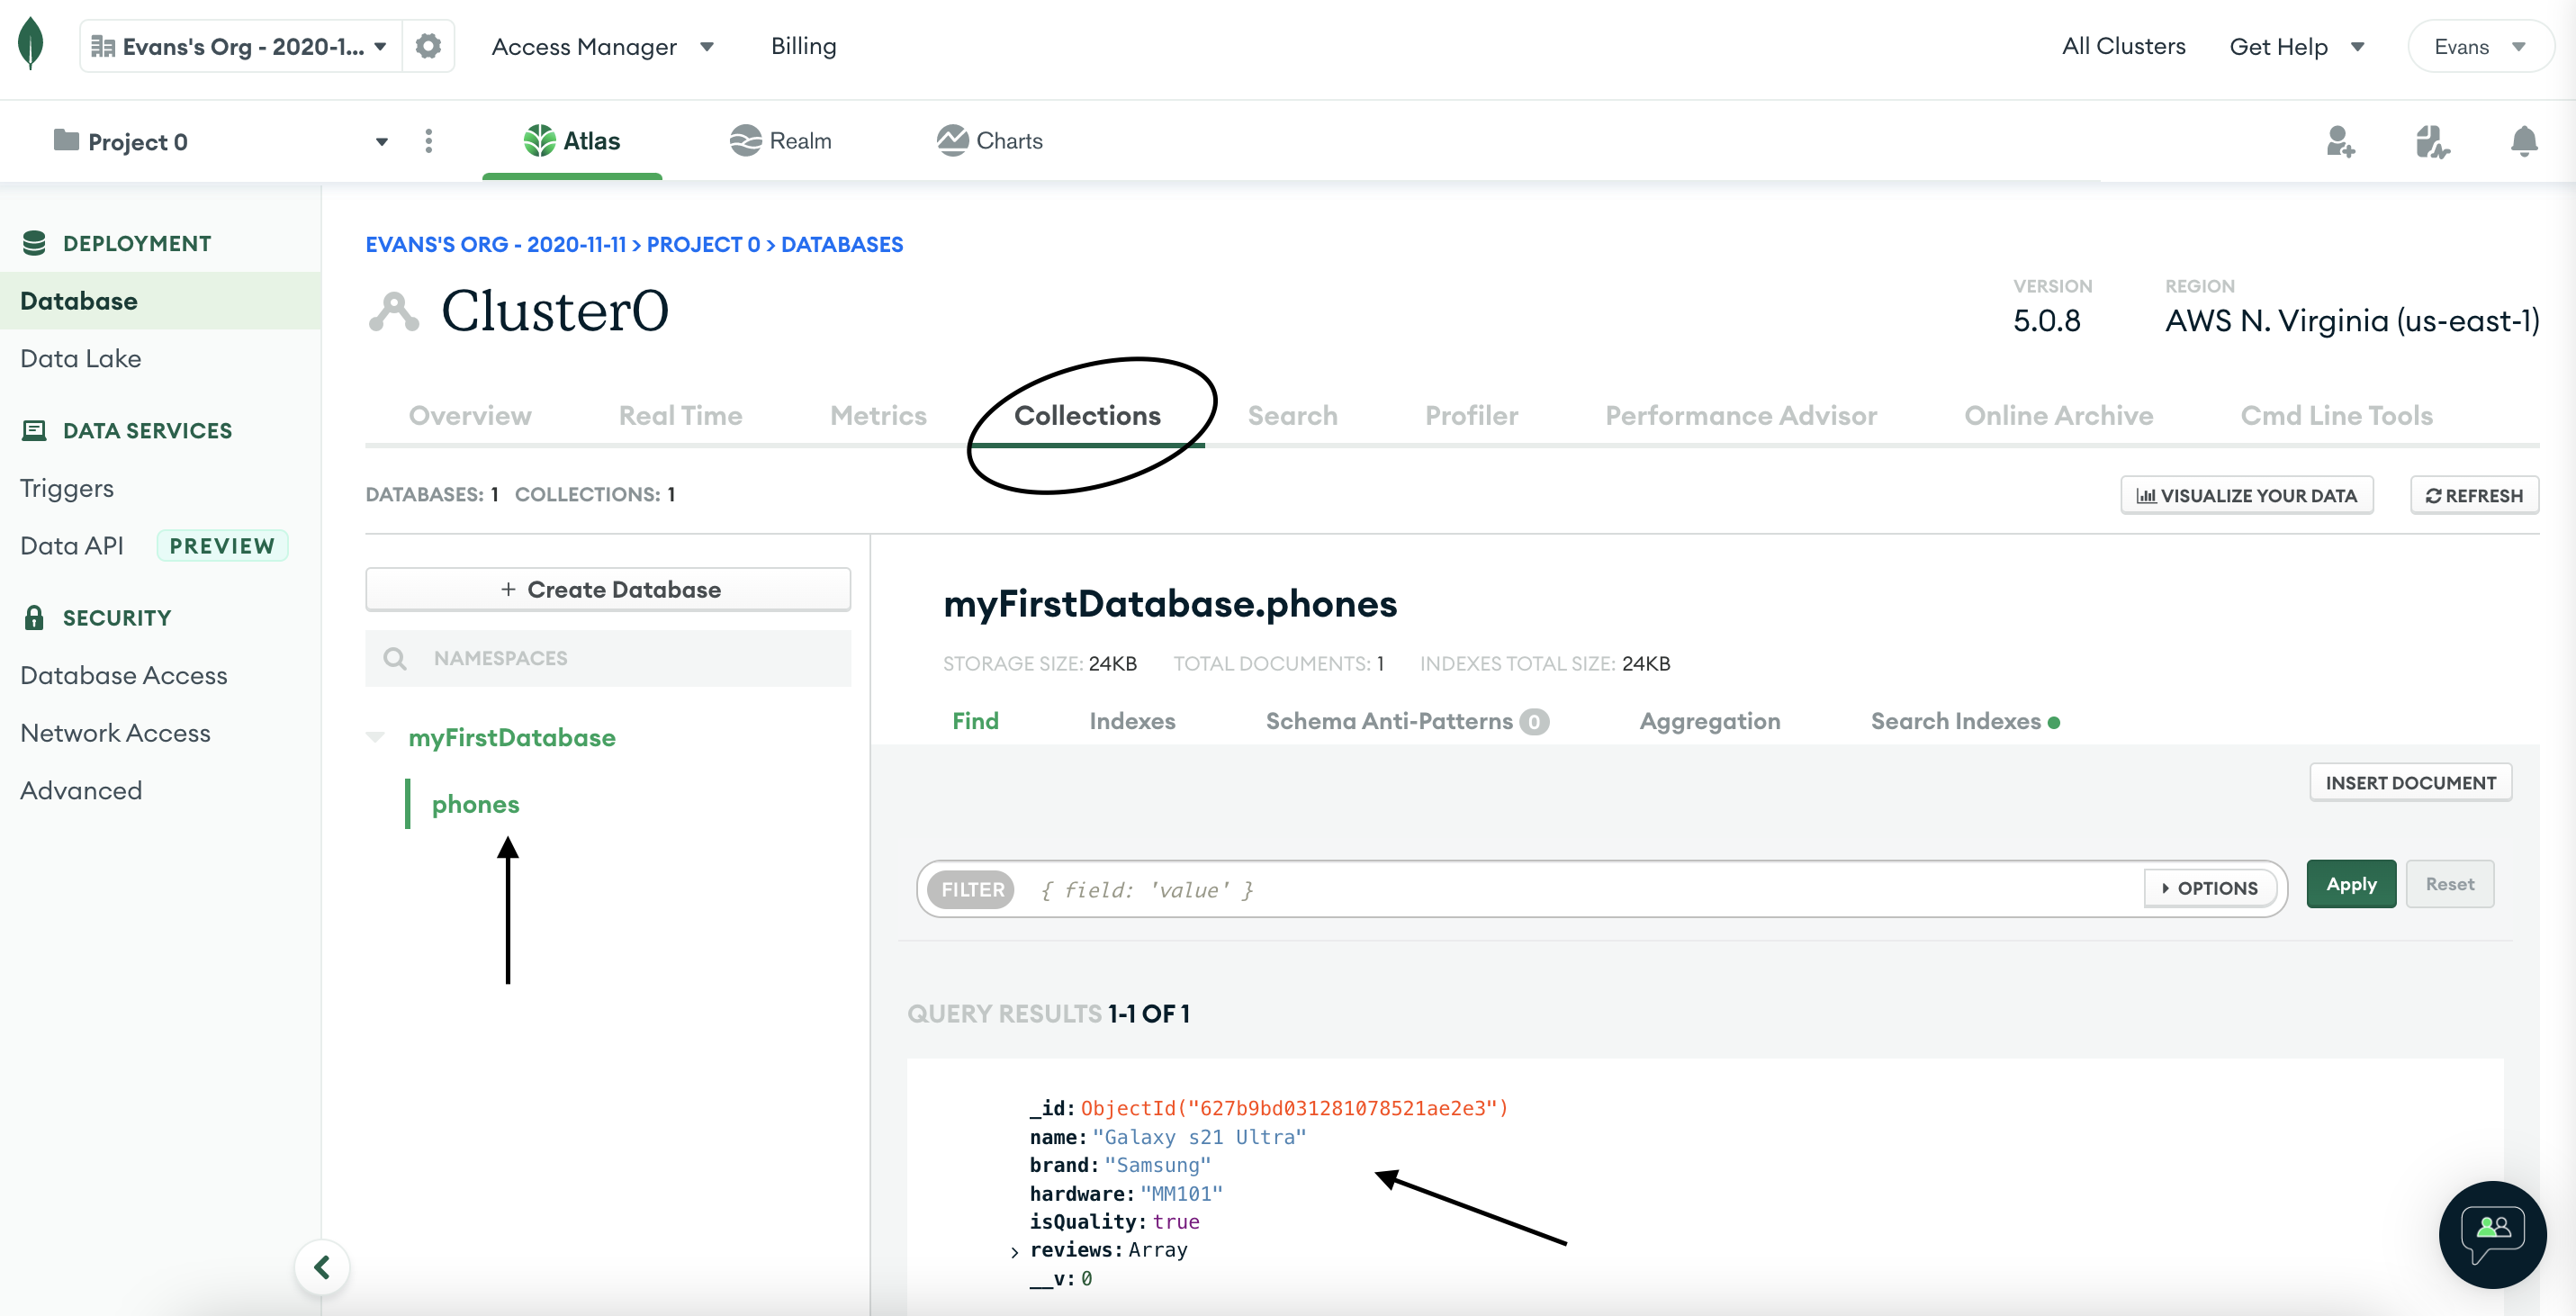
Copy the ID as you will need it to find the phone, consider the schema below
   type Query {
        getOnePhone(id: ID): Phone
    }
The getOnePhone query type takes the id to find the phone and returns it
R - Read
Now let's move on to see if we can read the data from the database.
Since we have already added the query root, just clear the GraphiQL interface, and send the query, use the following code below, just place the id of the phone from the database in the string.
query{
  getOnePhone(id:"place your id here"){
    id
    name
    hardware
    isQuality
    reviews{
      username
      text
    }
  }
}
And when the query is sent, you should get this response
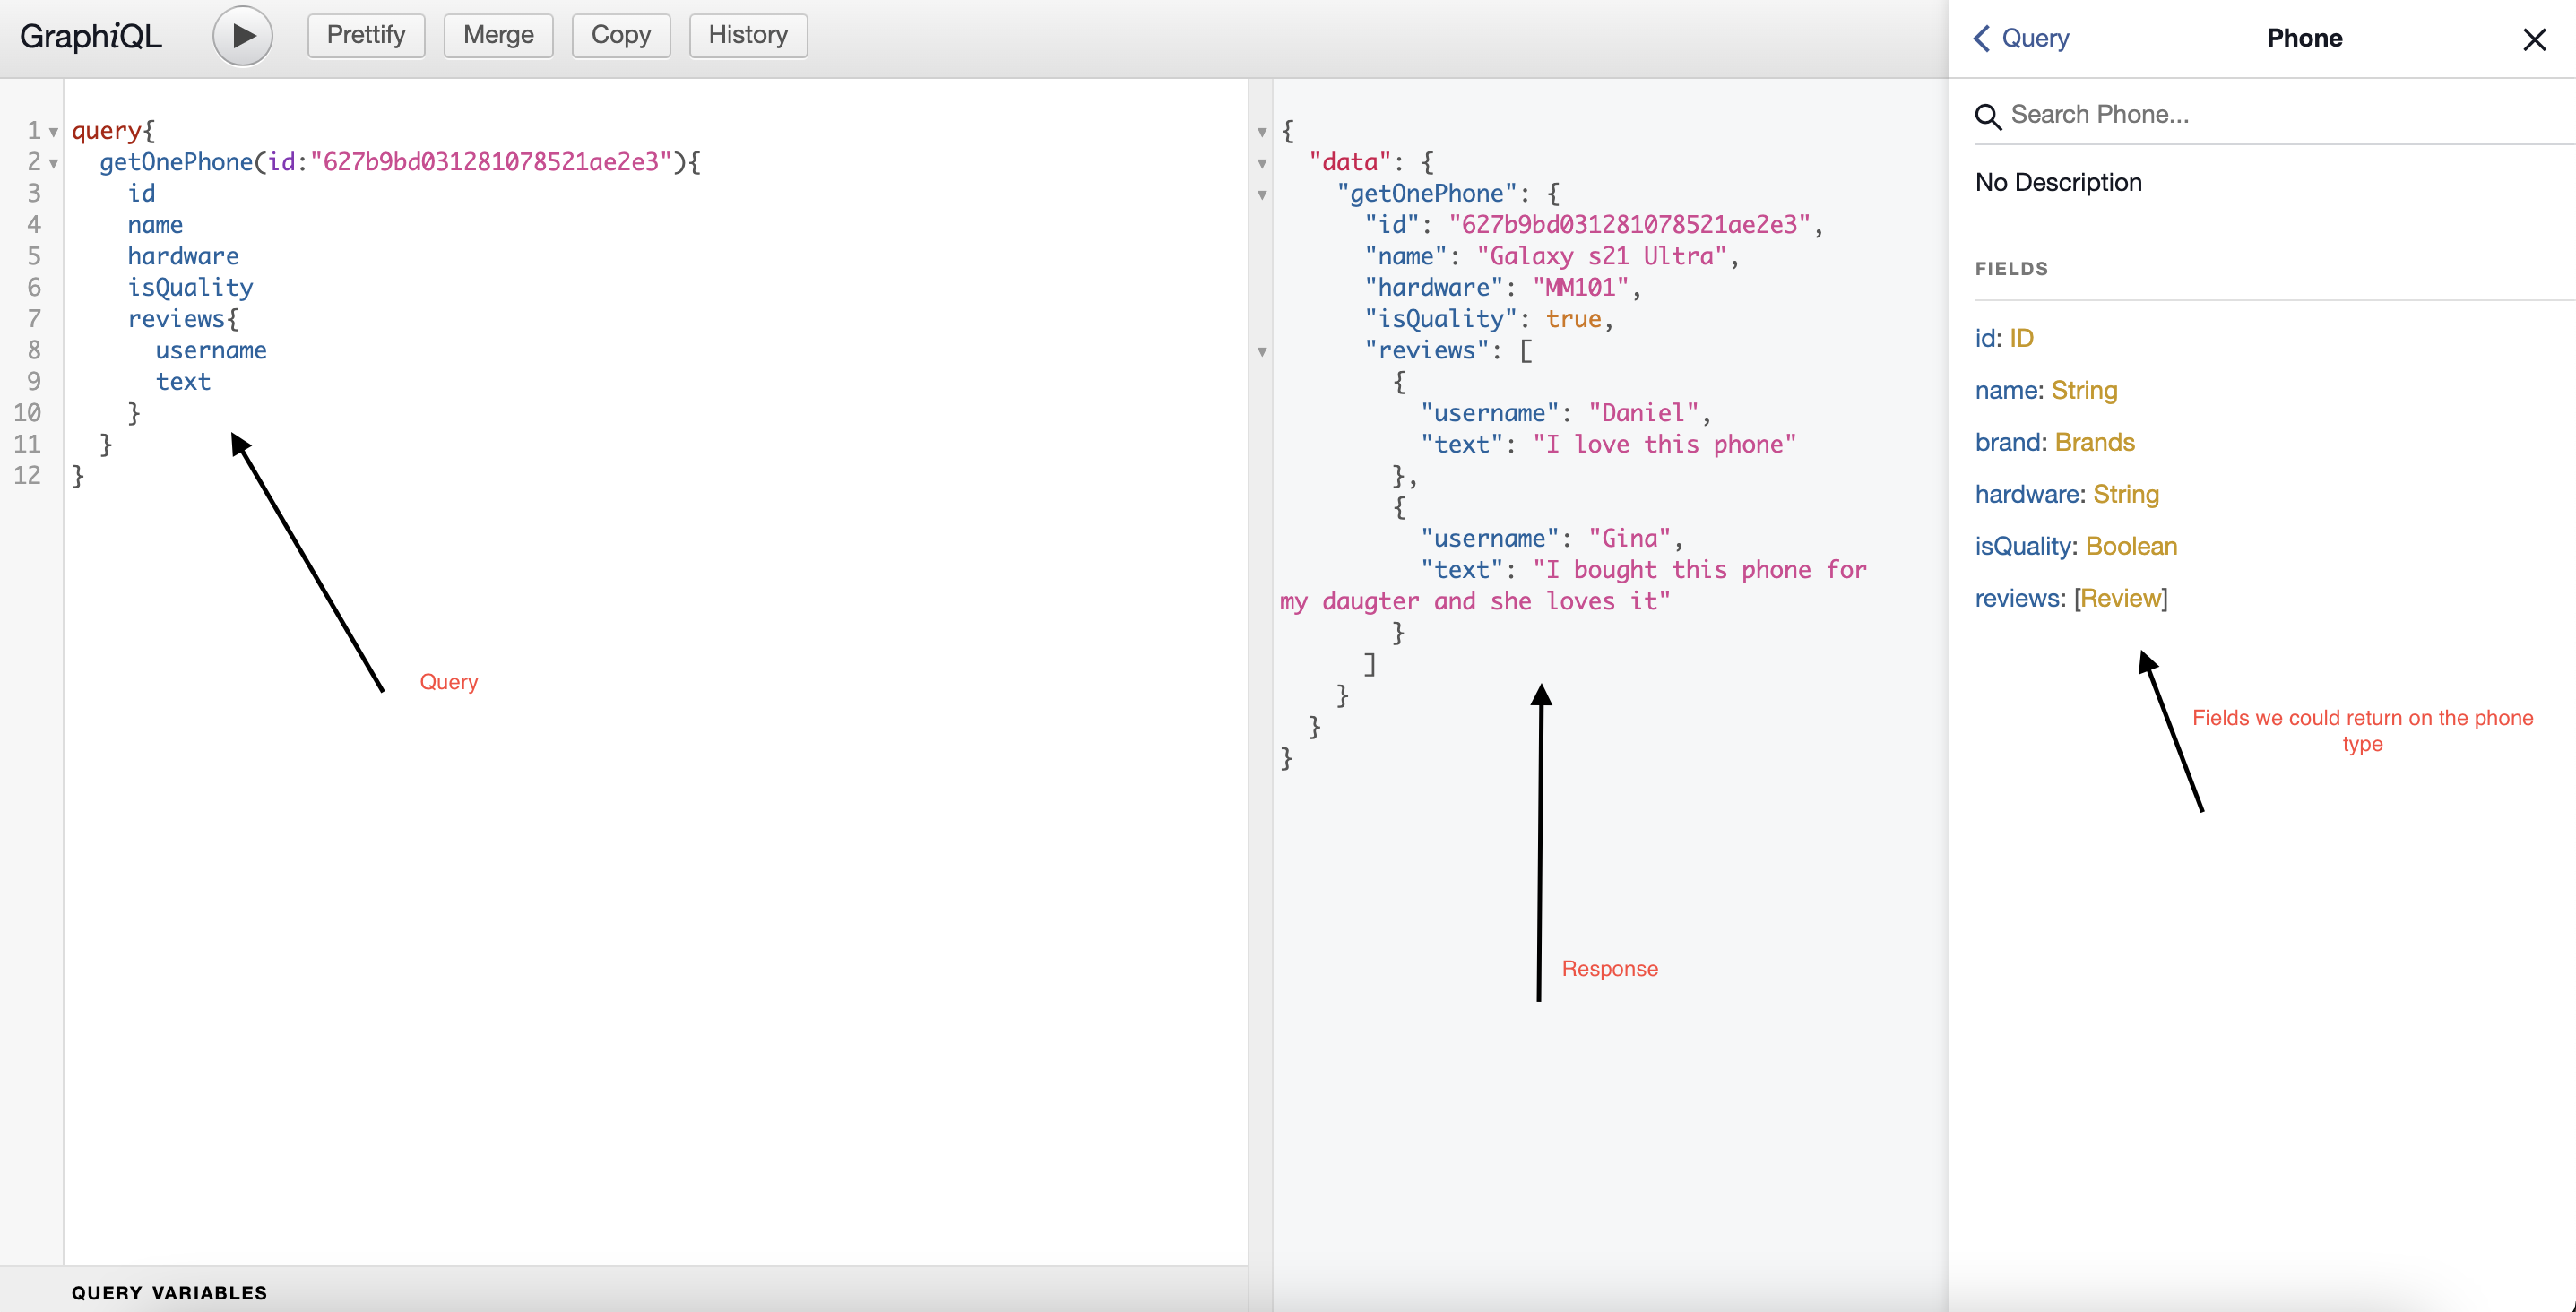
You can see we are getting the phone from the database.
U - Update
Assuming that after finding the new phone, we noticed the hardware version of the phone is QT103 instead of MM101 so let's implement the function to update the hardware version in the database. Open resolvers.js file and add the following code just below the create function.
    updatePhone: (root, { input }) => {
            return new Promise((resolve, object)=>{
                // get the id from graphQL pass it to mongo to update a friend in the db
                Phones.findByIdAndUpdate({_id:input.id},input,{new:true},(err, phone)=>{
              // do what you want with the error
                    if(err) console.log(err)
                    else resolve(phone)
                })
            })
        },
Now open schema.js file and add updatePhone to the mutation type so we can update the the phone is the database. Add the code below the createPhone in the mutation:
updatePhone(input: PhoneInput): Phone
The updatePhone type takes the phone input which could be the id, name of the phone and returns the phone after updating.
Now the type mutation on the schema should look like this
    type Mutation {
        createPhone(input: PhoneInput): Phone
        updatePhone(input: PhoneInput): Phone
    }
Restart the server and navigate to localhost:5050/graphql and send the request, copy and paste the code below. Please refer to point 1.0 to copy the id of the phone and place it on the id field. Use below code to send the request in the browser IDE.
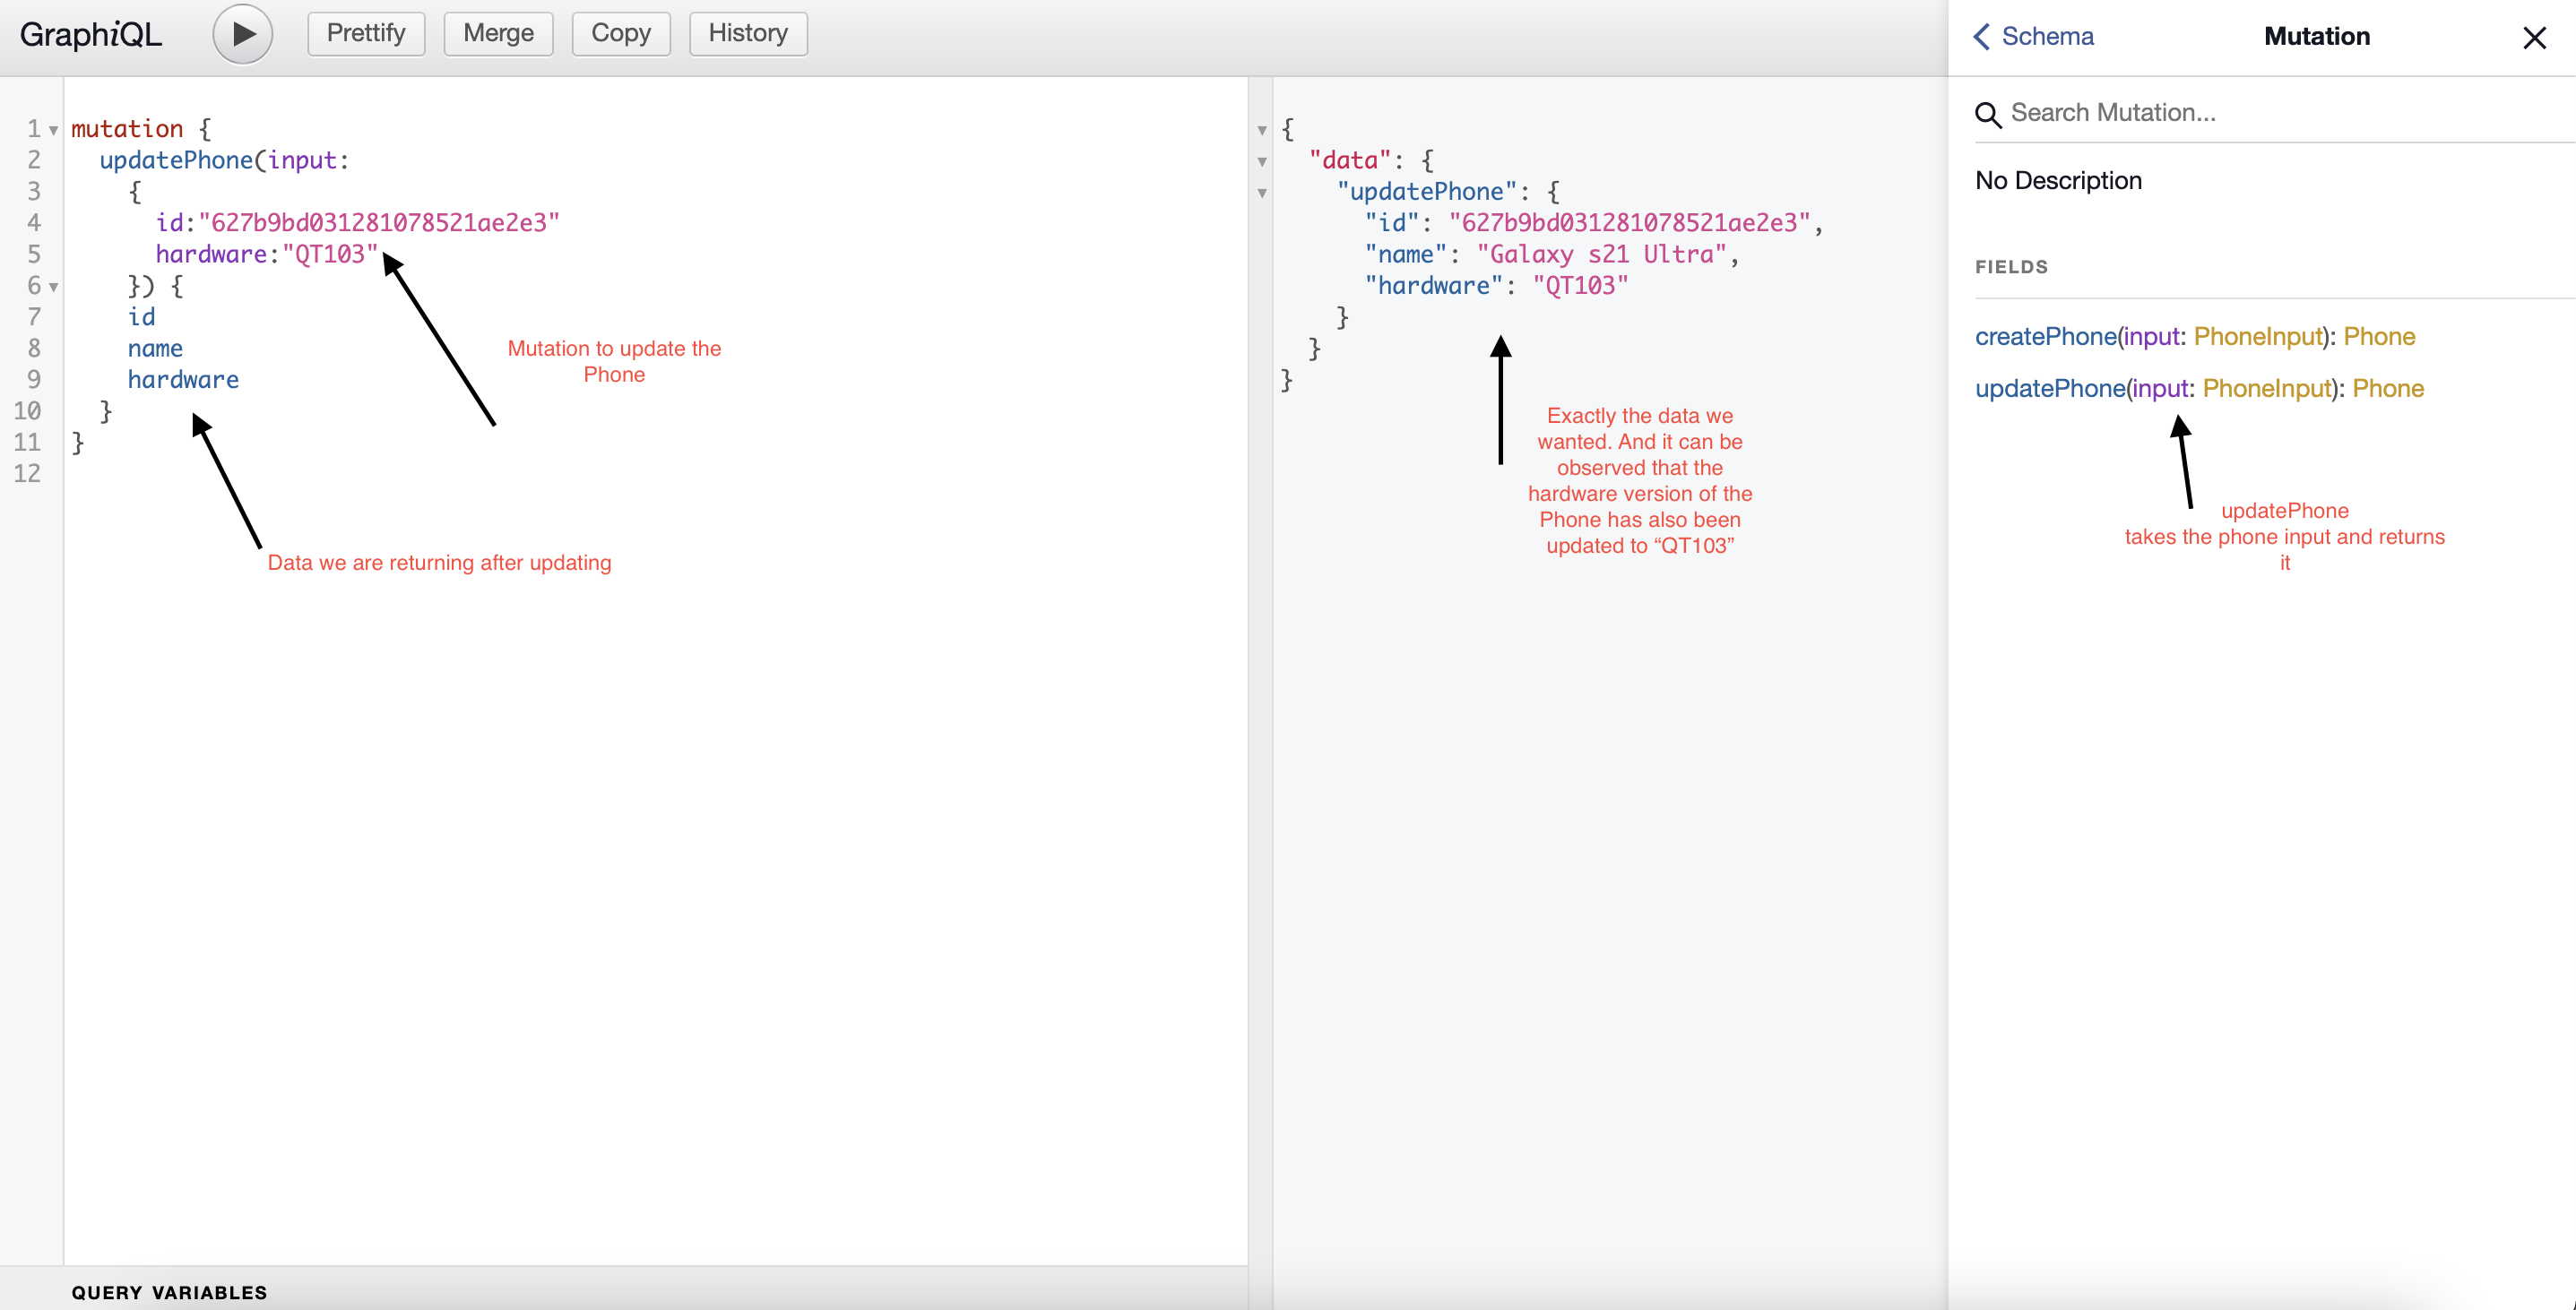
mutation {
  updatePhone(input:
    {
      id:"place the id of the phone from the database here"
      hardware:"QT103"
    }) {
    id
    name
    hardware
  }
}
And when the request is submitted, you can observe that the hardware version of the phone has been updated as you can even refer to point 1.0 to verify it from the database.
Checking from the Mongo Atlas collection
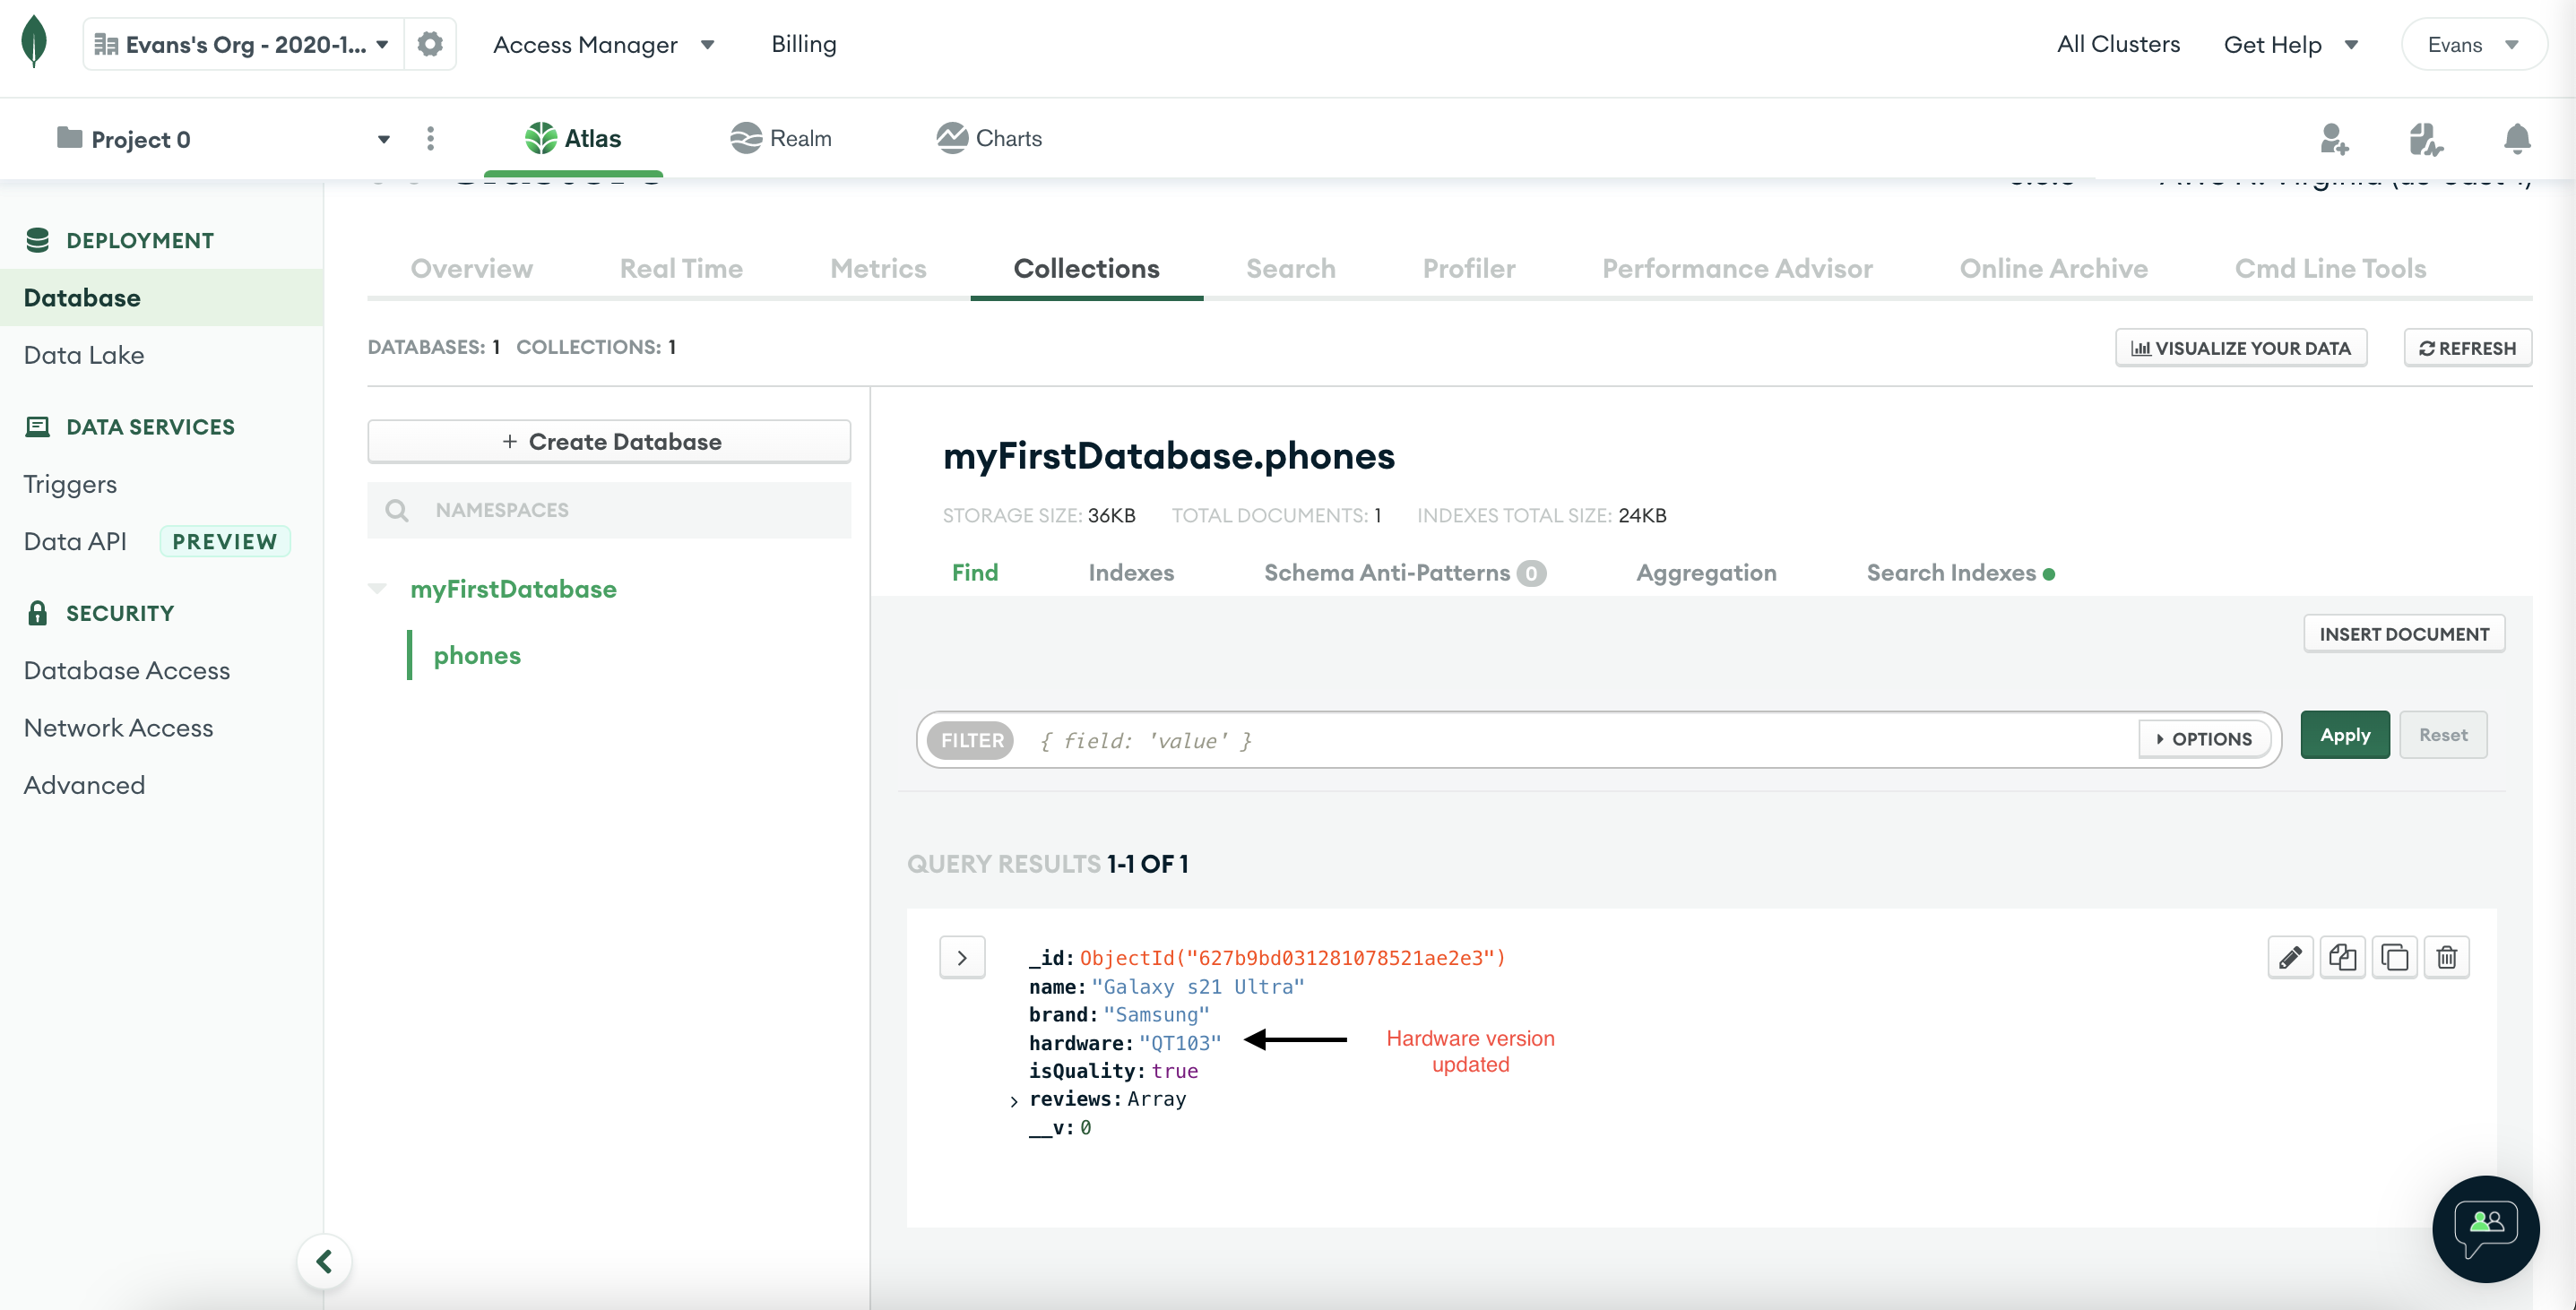
If you have reached this far, congratulations! we are done implementing the create, read, update functionality of the** CRUD API**. For the sake of understanding, i am leaving the DELETE part entire to you to figure it out. [HINT] - You will use the id to find the phone and remove it from the database.
Wrap Up
GraphQL is a query language for APIs and a runtime for fulfilling those queries with your existing data. It provides a complete and understandable description of the data in your API.
**Queries ** in GraphQL always return predictable results. Just ask for the **data **you want and it will return exactly that.
Object Type in GraphQL represent object you can fetch from your service, and what fields it has. Resolvers respond to queries and mutations and then returns the result of the query.
Thanks a lot for coming through. If you run through any issue, you can always comment below or connect with me on Linkedin Instagram Twitter
Happy coding!


