Building REST APIs (Node.js And Express)
What is REST ?

REST or Representational State Transfer, is an architectural style for providing standards between computer systems on the web, making it easier for systems to communicate with each other. REST defines a set of constraints for how the architecture of an Internet-scale distributed hypermedia system, such as the Web, should behave.
In this article we will be building RESTful API to do simple CRUD operations to demonstrate how REST works under the hood.
Prerequisites
We need some things setup first before we begin.
- Make sure you have Node.js and npm installed. I recommend installing their latest LTS or current stable version. You can install it via Node.js or NVM (Node Version Manager)
- Basic knowledge of terminal commands. Most of the commands are in the tutorial.
- Make sure you have your terminal open and your favorite text editor installed.
TOOLS
We will start a new project, i usually like to put it on my desktop so we open the terminal or any text editor of your choice and change directory to desktop with this command :
cd Desktop
And then create a directory to contain the project and change to the project directory :
mkdir RESTful-Routes-Demo && cd RESTful-Routes-Demo
mkdir is the name of the command followed by the project name. Now we can initialize the project with npm and install the packages needed for the project :
npm init
The npm init is used to set up a new or existing npm package
Install the packages needed for the project:
npm install --save express ejs uuid path method-override
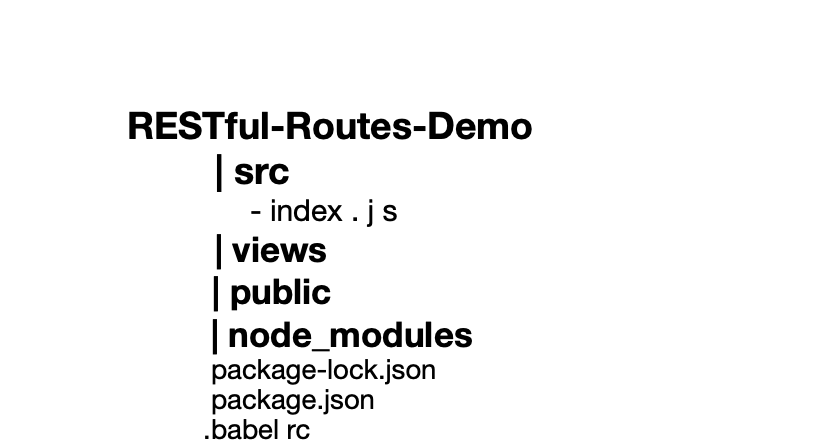
After installation is done, we will open the project in our favorite text editor and set up the server in /src directory inside RESTful-Routes-Demo/
from the command line RESTful-Routes-Demo/ % :
mkdir src && cd src
The above command will create a new directory src inside RESTful-Routes-Demo/ and change directory to it so the path will be RESTful-Routes-Demo/src %.
Now let's create the index file in RESTful-Routes-Demo/src to serve as the entry file%:
touch index.js
You can also create it manually inside the directory
We will be writing Es6 so let's install the following plugins
Using npm:
-:RESTful-Routes-Demo/ % :
npm install --save-dev @babel/core @babel/node
Or using yarn:
yarn add --save-dev @babel/core @babel/node
It will install Babel CLI tool locally in your project folder. Once completed, open package.json file you will see the new devDependencies section :
 "devDependencies": {
    "@babel/core": "^7.7.5",
    "@babel/node": "^7.7.4",
  }
And modify package.json scripts section to :
  "scripts": {
    "start": "npx babel-node src/index.js",
    "test": "echo \"Error: no test specified\" && exit 1"
  }
So we can start the server with :
npm start
To enable the transformation of JavaScript using Babel, you need to install the latest presets:
Using npm :
npm install --save-dev @babel/preset-env
Or yarn :
yarn add @babel/preset-env --dev
To use a preset, you create a new file named .babelrc in the project folder RESTful-Routes-Demo/ with the following content:
{
    "presets": ["@babel/preset-env"]
}
Now we have the support for Es6, and in the end your package.json file should look like this :
{
  "name": "restful-routes-demo",
  "version": "1.0.0",
  "description": "",
  "main": "index.js",
  "scripts": {
    "start": "npx babel-node src/index.js",
    "test": "echo \"Error: no test specified\" && exit 1"
  },
  "keywords": [],
  "author": "",
  "license": "ISC",
  "dependencies": {
    "ejs": "^3.1.6",
    "express": "4.17.1",
    "method-override": "^3.0.0",
    "path": "^0.12.7",
    "uuid": "3.3.3"
  },
  "devDependencies": {
    "@babel/core": "^7.7.5",
    "@babel/node": "^7.7.4",
    "@babel/preset-env": "7.7.6"
  }
}
So we need to import the packages we installed inside index.js and use them:
//to start the server and  configure routes
import express from 'express';
const app = express();

//so we can send patch or put requests
import methodOverride from 'method-override';
//to generate random ids
import { v4 as uuidv4 } from 'uuid';
uuidv4();

// render html, helps to embed javascript directory inside html
import 'ejs';
We need to tell express to use the packages we have imported :
// for parsing application json/x-www-form-urlencoded
app.use(express.json());
app.use(express.urlencoded({ extended: true }));
app.use(methodOverride('_method'));
Let's set the path to look inside the views directory so we can render html and also set the view engine to .ejs so we will not have to use the .ejs extension when rendering html documents eg. home.ejs we can just use home
app.set('view engine', 'ejs');
app.set('views', path.join(__dirname,'../views'));
So let's create the views directory from the command or manually inside RESTful-Routes-Demo/ %:
mkdir views
And finally let's configure the port to run on port 8080
const port = 8080;
And at the bottom of index.js :
app.listen(port,() =>{
    console.log(`Server is listening on port ${port}`);
});
And in the end index.js file should look like this :
//to start the server and  configure routes
import express from 'express';
const app = express();

//so we can send patch or put requests
import methodOverride from 'method-override';
//to generate random ids
import { v4 as uuidv4 } from 'uuid';
uuidv4();
// render html, helps to embed javascript directory inside html
import 'ejs';

// for parsing application json/x-www-form-urlencoded
app.use(express.json());
app.use(express.urlencoded({ extended: true }));
app.use(methodOverride('_method'));


app.set('view engine', 'ejs');
app.set('views', path.join(__dirname,'../views'));

const port = 8080;


app.listen(port,() =>{
    console.log(`Server is listening on port ${port}`)
});
Project structure
Now we can start the server from the commandLine:
-:RESTful-Routes-Demo % :
npm start
And if everything went smooth you should see
Server is listening on port 8080
printed to the console
 congrats 🎉🤩😊👌🤩
You have successfully set up the development environment for the project. Now, we’ll explore how the communication between the client and server actually happens when we are implementing a RESTful interface.
In the REST architecture, clients send requests to retrieve or modify server resources, and servers send responses to these requests.
We can take a look at the typical ways to make requests and how responses are delivered.
HTTP AND HTTP REQUESTS
Hypertext Transfer Protocol (HTTP) is an application-layer protocol for transmitting hypermedia documents, such as HTML. It is an application layer protocol designed within the framework of the Internet protocol suite. HTTP follows a classical client-server model, with a client opening a connection to make a request, then waiting until it receives a response. HTTP is a stateless protocol, meaning that the server does not keep any data (state) between two requests.[ ref ]
REST requires that a client make a request to the server in order to retrieve or modify data on the server. A request generally consists of:
- an HTTP verb, which defines what kind of operation to perform
- a header, which allows the client to pass along information about the request
- a path to a resource
- an optional message body containing data
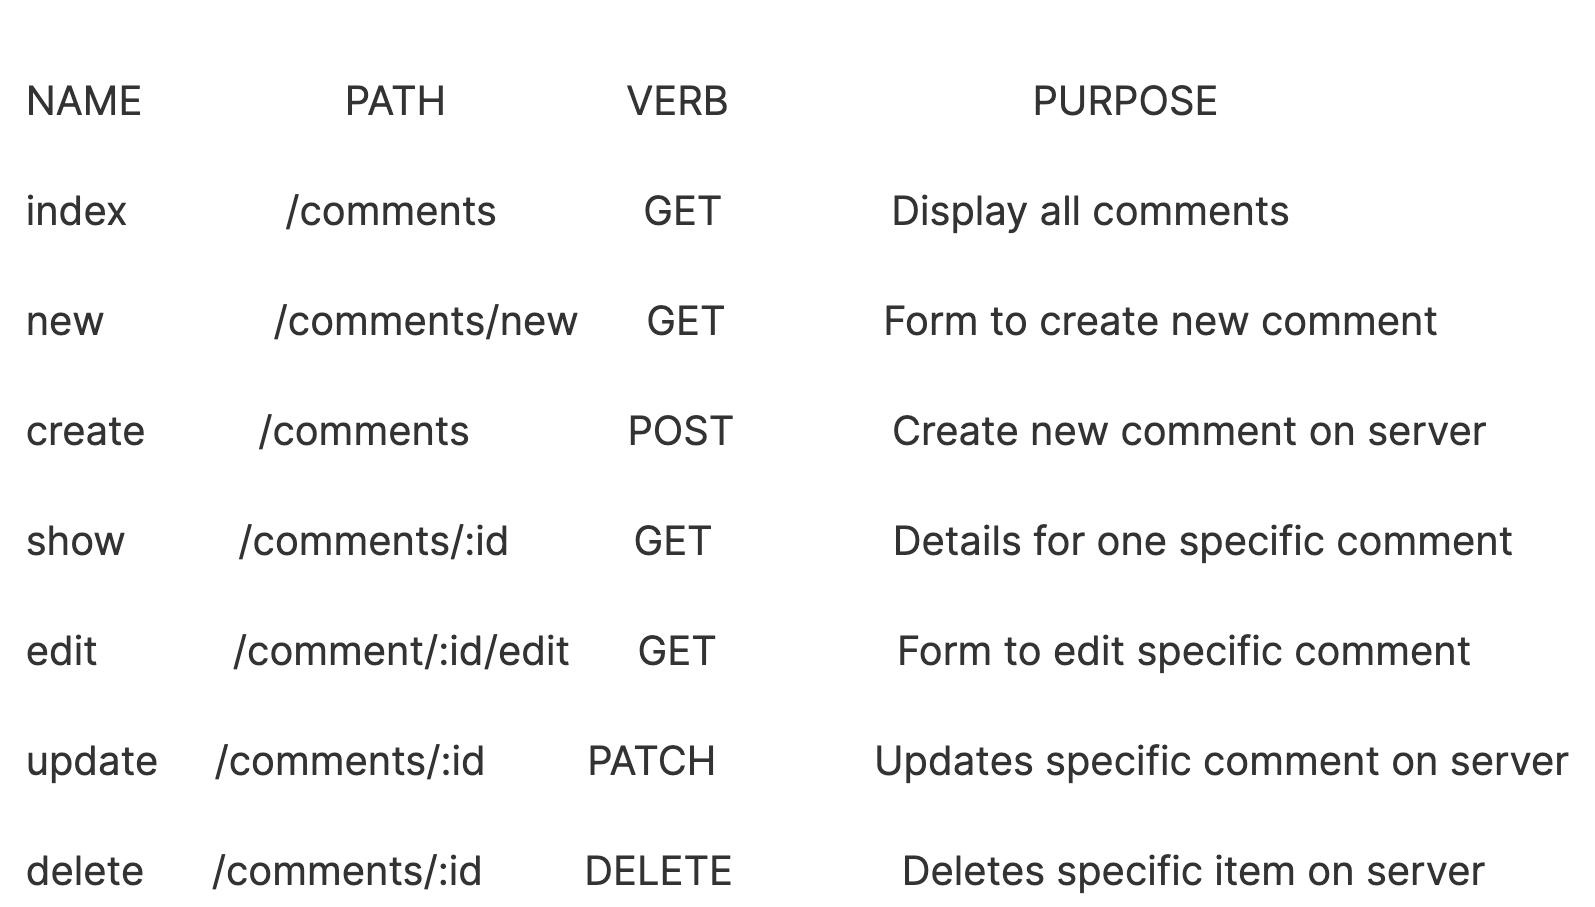
HTTP Verbs
We will talk about the 6 basic HTTP verbs we use in requests to interact with resources in a REST system:
GET — request data from a specified resource or a collection of data
- Data is sent via the query string which makes the information plainly visible in the url
POST — post data to a server to create/update a resource.
Example of where post method is applied is :
- Providing a block of data such us the result of submitting a form from users.
- Annotation of existing resources.
- Extending a database through an append operation.
Data is sent via the request body not the query string so you don't really see it in the url like GET requests where the query is plainly visible in the url.
NOTE : You can extract data from the post body and do something with it by PARSING the body of the request. GET request is an object made based on the incoming http request but POST request include a property called req.body which returns the value of the input.
PUT — update a specific server resource
DELETE — remove a specific server resource
PATCH - apply partial modifications to a resource
PUT - replaces all current representations of the target resource with the request payload
Headers and Accept parameters
The HTTP Accept header is a request type header. The Accept header is used to inform the server by the client that which content type is understandable by the client expressed as MIME-types. By using the Content-negotiation the server selects a proposal of the content type and informs the client of its choice with the Content-type response header. If the Accept header is not present in the request, then the server assumes that the client accepts all types of media.
Syntax:
Accept: <MIME_type>/<MIME_subtype> | <MIME_type>/* | */*
MIME Types, used to specify the content types in the Accept field, consist of a type and a subtype. They are separated by a slash (/).
For example :
- This example accepts the text type with the subtype of css.
Accept: text/css - This MIME media type accepts JSON text .
application/json
Paths
Requests must contain a URL path to a resource that the operation should be performed on. In RESTful APIs, paths should be designed to help the client know what is going on.
A URL (Uniform Resource Locator) identifies a resource on a remote server and gives the network location on that server. The URL path is the string of information that comes after the top level domain name. You can use the HTTP-proxy to block websites that contain specified text in the URL path. You can add, delete, or modify URL path patterns.
A path like store.com/customers/556/orders/9 is clear in what it points to, even if you’ve never seen this specific path before, because it is hierarchical and descriptive. We can see that we are accessing the order with id 9 for the customer with id 556.
Paths should contain the information necessary to locate a resource with the degree of specificity needed.For example GET www.example.net/customers/:id - retrieves the customers resource with the id specified. DELETE examplesite.com/customers/:id — deletes the item in the customers resource with the id specified.
Content Types
In the case where the server is sending a data payload to the client, the server must include a content-type in the header of the response. The content-type header field alerts the client to the type of data it is sending in the response body. [ref]
Using Comments as a resource to implement RESTful APIs
We won't use a real database for this demo so let's assume this is our database containing the comment's (Add this just below port variable on /src/index) :
const comments =[ {
      id: uuidv4(),
      username: 'TRAVELER1-EVANS',
      comment:'Wow this place is very beautiful'
   },
     {
      id: uuidv4(),
      username: 'TRAVELER2-KAREN',
      comment:'Lol that is actually the way to dive'
   },
     {
      id: uuidv4(),
      username: 'TRAVELER3-THOMAS',
      comment:'hmmm i was thinking of going on a vacation next year and this place is list!!!'
   },
     {
      id: uuidv4(),
      username: 'TRAVELER4-KAZIAH',
      comment:'I visited this place a while back but it was not as beautiful as it is now'
   }
]
And just below this, let's create a route to serve the index page/home-page so we can show all comments :
app.get('/comments', (req,res)=>{
    res.render('index',{comments})
});
Cool! but we need to create the index.ejs file as it does not exist yet, inside views/ directory we create a new file index.ejs views/ index.ejs and add the following code:
<!DOCTYPE html>
<html lang="en">
<head>
    <meta charset="UTF-8">
    <meta http-equiv="X-UA-Compatible" content="IE=edge">
    <meta name="viewport" content="width=device-width, initial-scale=1.0">
    <title>All comments index</title>
</head>
<body>

</body>
</html>
Since we passed comments to the template, it now becomes available inside the template for us to access, so we will loop over to display all the comments in the template:
<!DOCTYPE html>
<html lang="en">
<head>
<meta charset="UTF-8">
<meta http-equiv="X-UA-Compatible" content="IE=edge">
<meta name="viewport" content="width=device-width, initial-scale=1.0">
<title>All comments index</title>
</head>
<body>
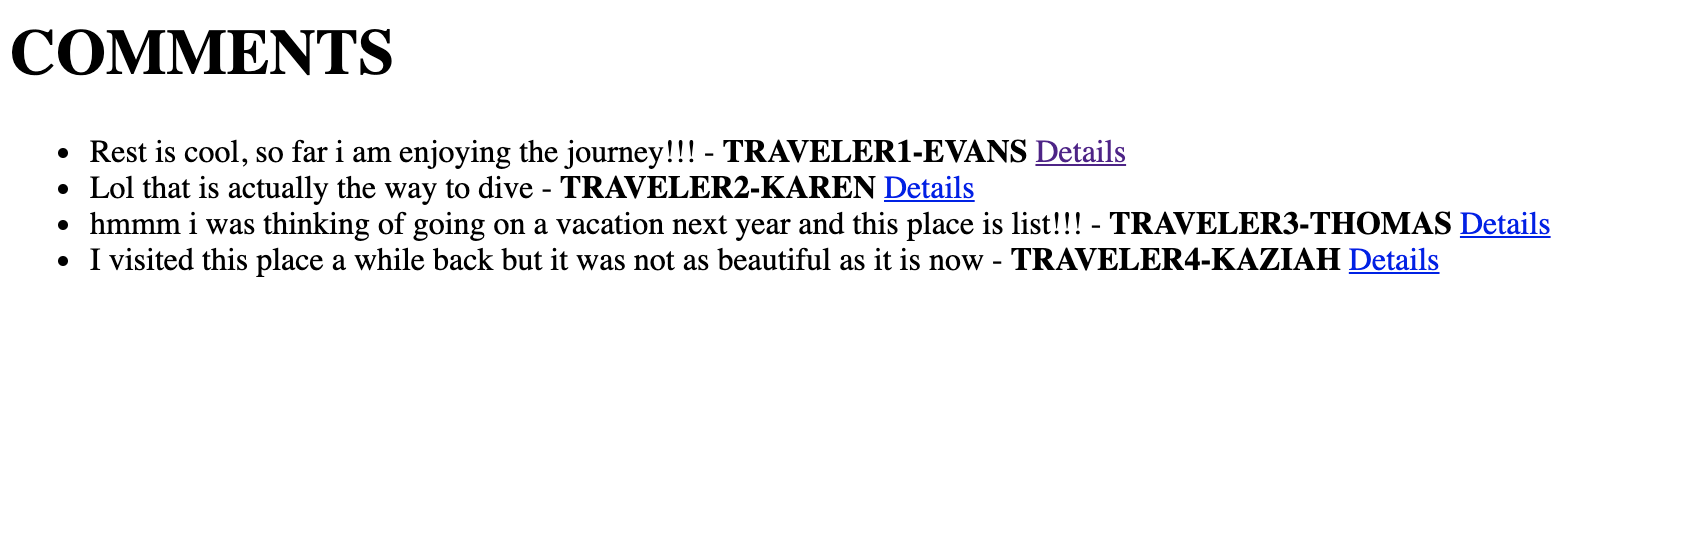
<h1>COMMENTS</h1>
<!-- Displaying all comments -->
<ul>
<% for(let comment of comments) {%>
<li><%=comment.comment%> - <b><%=comment.username %></b>
<% } %>
</ul>
</body>
</html>
and start the server :
npm start
If everything goes well, navigate to http://localhost:8080/comments in your browser and you should see all the comments rendered!!! yay!!!! 🤩🤩

What happened ? we made a GET request to path /comments and the server responded with a template containing all the comments. We are done with the first part of our CRUD operations demo now let's create the route to create a new comment, first we need to a route to serve the form and the POST route to create the comment on the server :
app.get('/comments/new',(req,res)=>{
    res.render('newCommentForm');
 });
We will create the file newCommentForm.ejs inside views/ directory and paste the following code inside:
<!DOCTYPE html>
<html lang="en">
<head>
    <meta charset="UTF-8">
    <meta name="viewport" content="width=device-width, initial-scale=1.0">
    <title>NEW COMMENTS</title>
</head>
<body>
    <h1>MAKE A NEW COMMENT</h1>
        <form action="/comments" method="POST">
         <section>
            <label for="username">Enter username:</label>
           <input type="text placeholder="Enter username" name="username" id="username">
    </section>
<section>
    <label for="text-area">Comment below</label>
    <br>
    <textarea name="comment" id="comment" cols="30" rows="10"></textarea>
</section>
<button>Submit</button>
    </form>
</body>
</html>
The action attribute specifies where to send the form-data when a form is submitted and the form will be submitted to /comments to create a new comment . The method attribute specifies how to send form-data (the form-data is sent to the page specified in the action attribute) / The HTTTP Verb.
Let's start the server to make sure the form is rendered correctly :
npm start
and got to http://localhost:8080/comments/new you should see the new form 🤩🔥🎉 another congrats!!

So let's create the route to POST the comment to the server when the form is submitted:
  app.post('/comments',(req,res)=>{
// destructure  username and the comment from the request body
   const {username, comment}= req.body;
   comments.push({username,comment,id:uuidv4()});
    res.redirect("/comments");
});
});
Now let's restart the server and navigate to http://localhost:8080/comments/new to make a new comment:

When the form is submitted we will notice that the new comment has been added on to the comments list :

Weihoo!!! 🤩😁😛😜 we are done with CREATE operation in CRUD.
OPTIONAL : Notice that everytime we make changes to the app we have to restart the server ? how tiring! that can be if we are developing a large scale application but luckily there is a package that can help us to solve this issue called nodemon, install node nodemon here this will start the server automatically for us anytime we make changes to the app :
Using npm :
npm i nodemon
And modify package.json file scripts section to :
  "scripts": {
    "start": "nodemon --exec babel-node  src/index.js",
    "test": "echo \"Error: no test specified\" && exit 1"
  },
Then restart the app, you should see :

In the terminal to indicate that nodemon started the server successfully now the server will restart automatically every time we make changes. Let's create the route to display information about a particular comment :
app.get('/comments/:id',(req,res) =>{
    const{id} =req.params;
    const comment = comments.find(foundComment => foundComment.id ===id);
    res.render('details',{comment});
})
Let's create the details.ejs file and paste the following code inside:
<!DOCTYPE html>
<html lang="en">
<head>
<meta charset="UTF-8">
<meta name="viewport" content="width=device-width, initial-scale=1.0">
<title>Details about a specific comment</title>
</head>
<body>
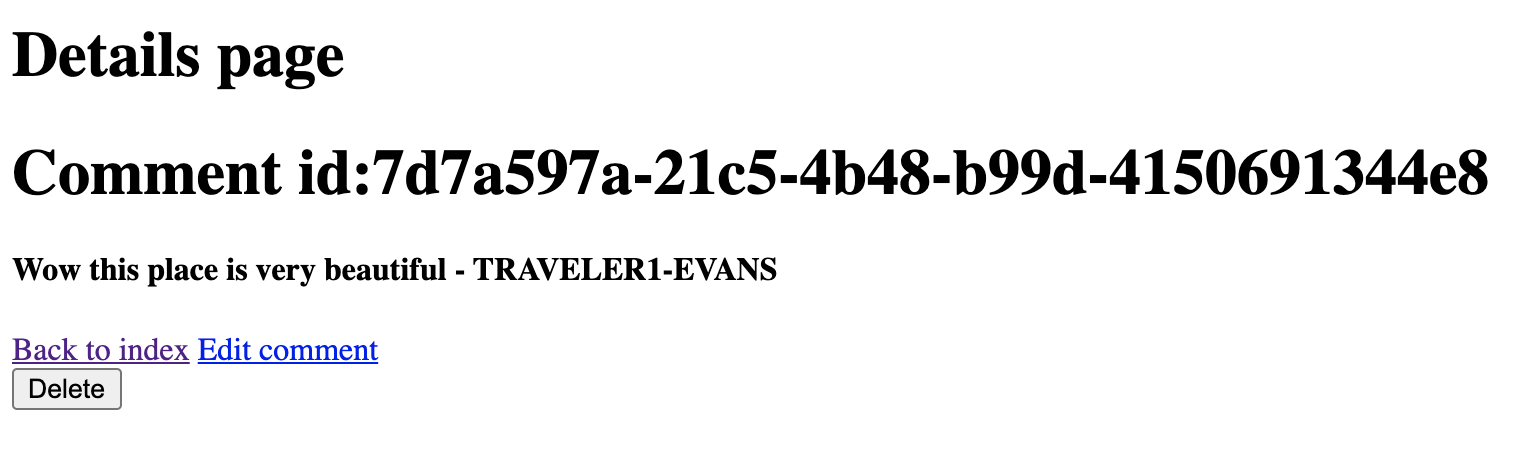
<h1>Details page</h1>
<h1>Comment id:<%= comment.id%></h1>
<h4><%= comment.comment%> - <b> <%= comment.username %></b></h4>
</body>
</html>
Now let's make each of the comments a link that when a you click it will take you to '/comments/:id to display information about a specific comment, paste this inside the ul, index.ejs :
<a href="/comments/<%= comment.id %> ">Details</a>
Now it should look like this :
  <ul>
           <% for(let comment of comments)  {%>
             <li><%=comment.comment%> - <b><%=comment.username %></b>
             <a href="/comments/<%= comment.id %> ">Details</a>
            </li>
       <% } %>
    </ul>
And when you navigate to http://localhost:8080/comments you will see that each comment now has a link to it :

And when you click on the link it will take you to http://localhost:8080/comments/c616b9d7-db5d-4219-8a07-eb58908ac2ff
As we can see the path /comments/ id same in the URL :

BONUS: For easy navigation add this link to the bottom of the code just below the h4 on details.ejs :
<a href="/comments">Back to index</a>
Finally we are done with the details part of our CRUD application so let's create the route to edit a specific comment, first we need a GET route to serve the form and a PUT/PATCH route to make modifications to a specific comment:
//route to serve the edit form
app.get('/comments/:id/edit',(req,res)=>{
// take the id from the parameter
  const{id} =req.params;
// use the id to find the comment in comments
  const comment = comments.find(c => c.id ===id);
  res.render('comments/edit',{comment})
});
We will create the edit.ejs file inside the views directory and paste the following code:
<!DOCTYPE html>
<html lang="en">
<head>
    <meta charset="UTF-8">
    <meta name="viewport" content="width=device-width, initial-scale=1.0">
    <title>EDITING</title>
</head>
<body>
    <h1>EDIT</h1>
<form method="POST" action="/comments/<%= comment.id%>/?_method=PATCH">
    <textarea name="comment" id="comment" cols="30" rows="10">
        <%= comment.comment%>
    </textarea>
    <button>Save</button>
</form>
</body>
</html>
This is where method-override comes to play, as you you can see we are sending a POST request but telling express to treat it as a PATCH request and since we passed the found comment to the template it now becomes available to the form , so we will populate the form with the existing data in this case the comment. Now lets implement the route to send the PATCH request :
app.patch('/comments/:id',(req,res)=>{
    const{id} =req.params;
    const newcommentTEXT= req.body.comment
    const findcomment = comments.find(c => c.id ===id);
    findcomment.comment =  newcommentTEXT;
    res.redirect('/comments');
});
When you navigate to http://localhost:8080/comments/any-id/edit you should see the form populated with the comment (The id must be of a valid comment ). So on the details page we we will make a link to edit the comment ,open details.ejs and past this this code just below the last anchor tag:
<a href="/comments/<%= comment.id %>/edit ">Edit comment</a>
It should look like this :
 <h1>Details page</h1>
    <h1>Comment id:<%= comment.id%></h1>
   <h4><%= comment.comment%> -  <b> <%= comment.username %></b></h4>
   <a href="/comments">Back to index</a>
   <a href="/comments/<%= comment.id %>/edit ">Edit comment</a>
And now we will have edit comment next to the other link:

When you click on it , you will see the form populated with the comment:

Let's edit it to something else :

And when the form is submitted we will notice that the comment has been updated to the new comment we just changed to (first comment):
COOL isn't it ? so far we have completed the most crucial aspect of the CRUD application remaining DELETE method. So let's create the route to send the request to delete a specific comment (each comment has an id therefore we will use the id to filter it from the comments):
app.delete('/comments/:id',(req,res)=>{
    const{id} =req.params;
    comments =comments.filter(c => c.id !==id);
    res.redirect('/comments');
});
We will need to put the form and the delete button somewhere in the app so users can easily delete comment, so lets open details.ejs file and paste this code just below the 'Edit comment' :
 <form method="POST" action="/comments/<%= comment.id%>/?_method=DELETE">
        <button>Delete</button>
    </form>
It now becomes this :
   <h1>Comment id:<%= comment.id%></h1>
   <h4><%= comment.comment%> -  <b> <%= comment.username %></b></h4>
    <a href="/comments">Back to index</a>
    <a href="/comments/<%= comment.id %>/edit ">Edit comment</a>
    <form method="POST" action="/comments/<%= comment.id%>/?_method=DELETE">
        <button>Delete</button>
    </form>
Good! now let's view a comment details and below it you should have a button:
Awesome! and when clicked it will remove the comment from the list.
BONUS You can add this link under the index page to create a new comment instead of having to type it all the time in the URL index.ejs just below the ul:
<a href="/comments/new">Make a new comment</a>
Now we have completed the whole CRUD operations in the App, this is beginner friendly so everyone should be able to follow through , and in case you are stuck anywhere you can always look at the complete code on my Github repository here
Thank you so much for the effort and time you will devote to this project and hopefully this helps someone out there!! Happy coding!!!


